
Gentoo Linux installation media
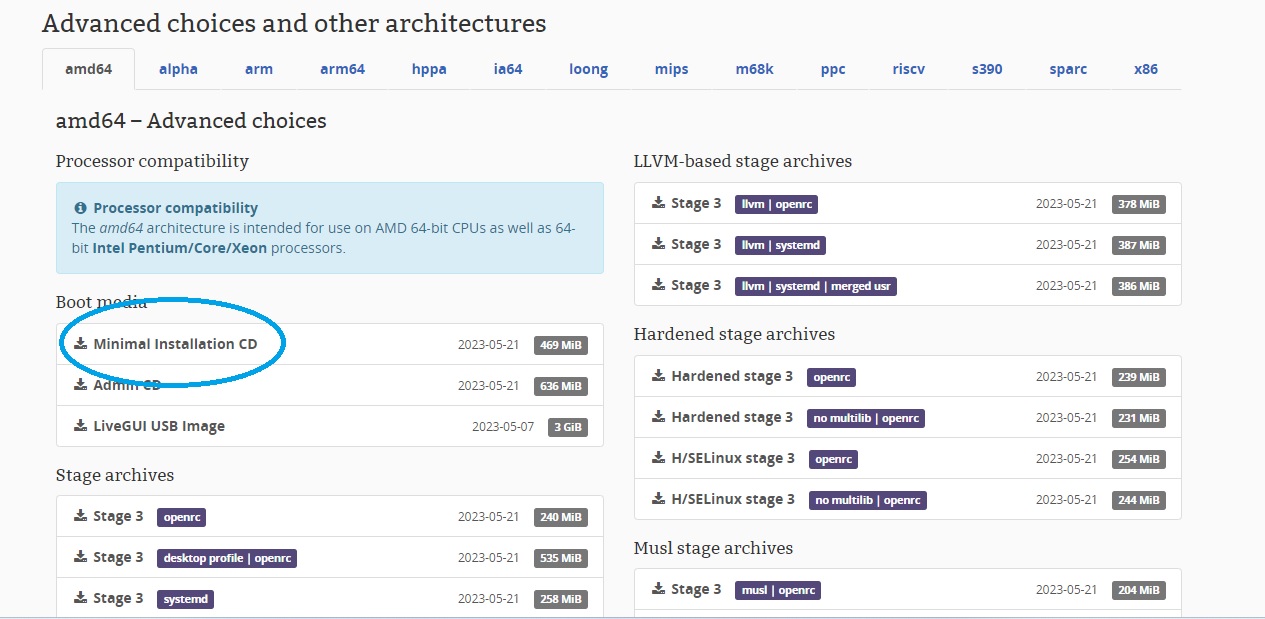
This tutorial is intended to work on AMD64-compatible processors, Glibc C library, GCC C Compiler, and OpenRC service manager. Get the minimal Installation CD file at https://www.gentoo.org/downloads/. Pick the one that belongs to AMD64 architecture.
Setting up a Virtual Machine with Virtualbox
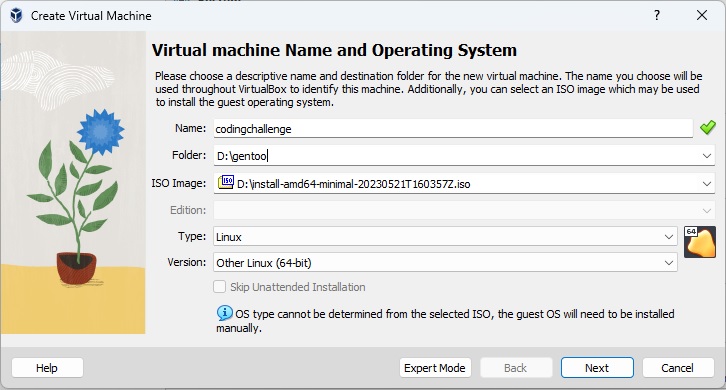
Open Virtualbox, and click on "New". Enter a name for your VM, choose a location where you want to save the VM, choose an ISO image and navigate to the gentoo minimal Installation CD file that you have downloaded earlier. Change the type to "Linux", and set the version to the distro you're using.
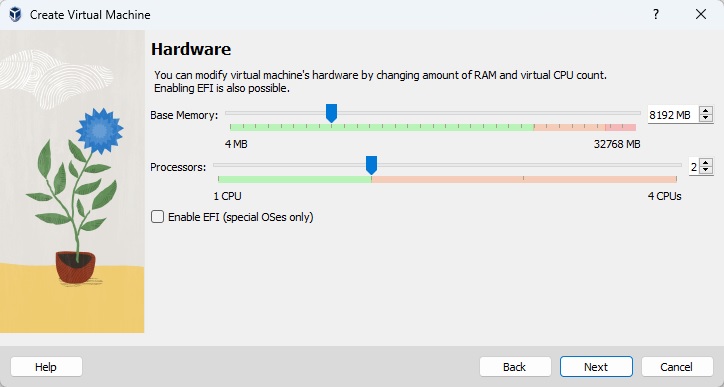
Set the amount of memory in megabytes to be allocated to the VM, set the number of virtual CPU, and check the box "Enable EFI (Special OSes only)".
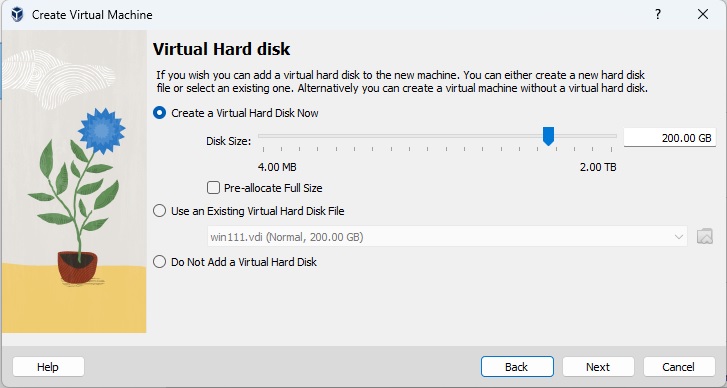
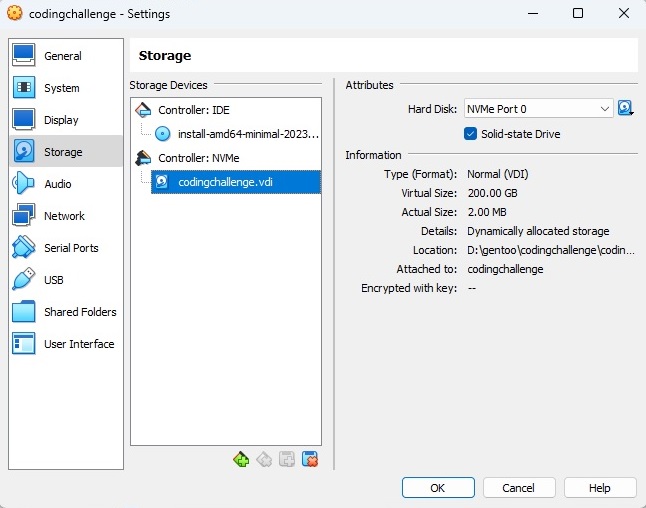
Set the size of the virtual hard disk in megabytes to be allocated to the VM.
Once done, click button "Finish".
Next click on "Settings", choose menu "Storage", and remove SATA controller.
Then you add a NVMe controller to connect virtual hard disks.
Finally, click on "Start".
Creating GPT Disk Partitions
To begin, SCSI and Serial ATA drives are both labeled under device handles such as: /dev/sda, /dev/sdb, /dev/sdc, etc. On more modern machines, PCI Express based NVMe solid state disks have device handles such as /dev/nvme0n1, /dev/nvme0n2, etc.
| Type of device | Default device handle | Description |
|---|---|---|
| SATA, SAS, SCSI, or USB flash |
/dev/sda/dev/sdb/dev/sdcetc |
These types of devices can be connected via the SATA bus, SCSI, USB bus as block storage. As example, the first partition on the first SATA device is called /dev/sda1. |
| NVM Express (NVMe) |
/dev/nvme0n1/dev/nvme0n2/dev/nvme0n3etc |
NVMe drives are connected to the PCI Express bus. The first partition on the first NVMe device is called /dev/nvme0n1p1. |
The following partitioning scheme will be used as a simple example layout:
| Partition | Filesystem | Size | Description |
|---|---|---|---|
/dev/nvme0n1p1 |
fat32 (UEFI) | 128M | EFI system partition |
/dev/nvme0n1p2 |
ext4 | 256M | Boot partition |
/dev/nvme0n1p3 |
(swap) | RAM size * 2 | Swap partition |
/dev/nvme0n1p4 |
ext4 | Rest of the disk | Root partition |
Fire up fdisk against the disk:
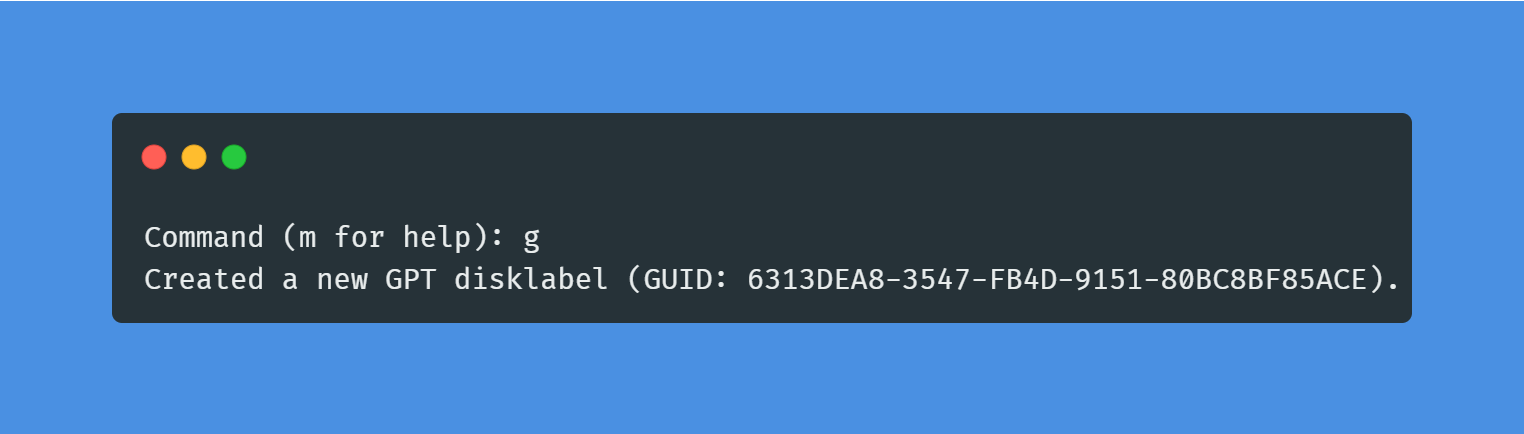
fdisk /dev/nvme0n1When using UEFI, type g to create a new GPT disklabel on the disk; this will remove all existing partitions.
First create a small EFI system partition, which will also be mounted as /boot/efi. Type n to create a new partition, followed by 1 to create the first partition, /dev/nvme0n1p1. When prompted for the first sector, make sure it starts from 2048 (which may be needed for the boot loader) and hit Enter. When prompted for the last sector, type +128M to create a partition 128 Mbyte in size:
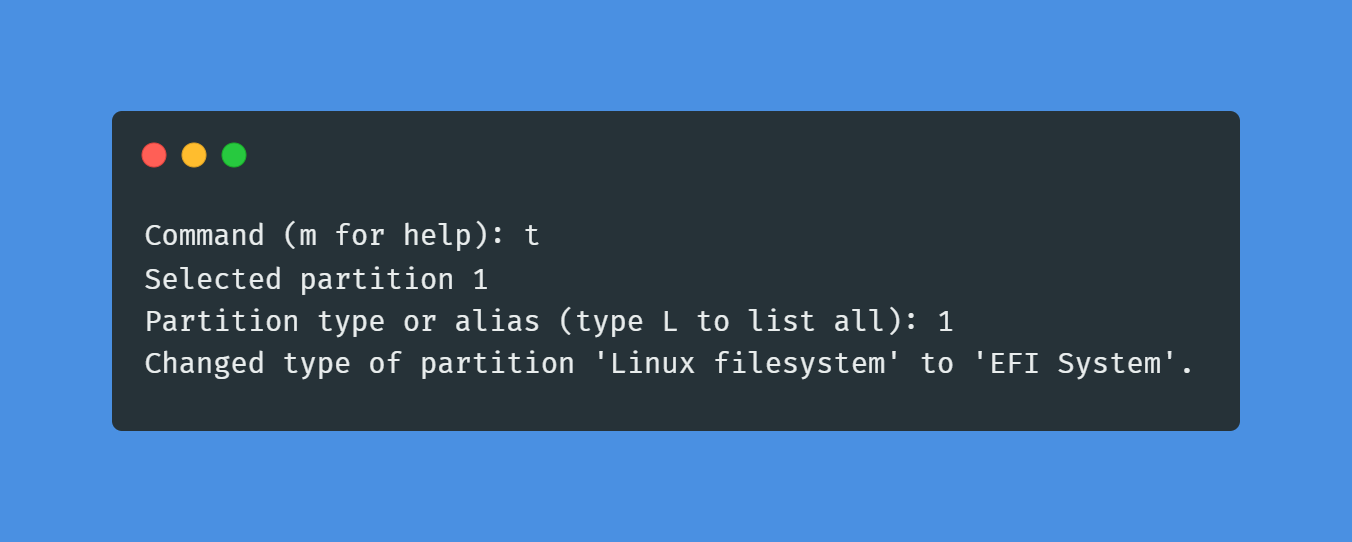
Mark the partition as EFI system partition. Type t to set the partition type, and then type in 1 to set the partition type to "EFI System".
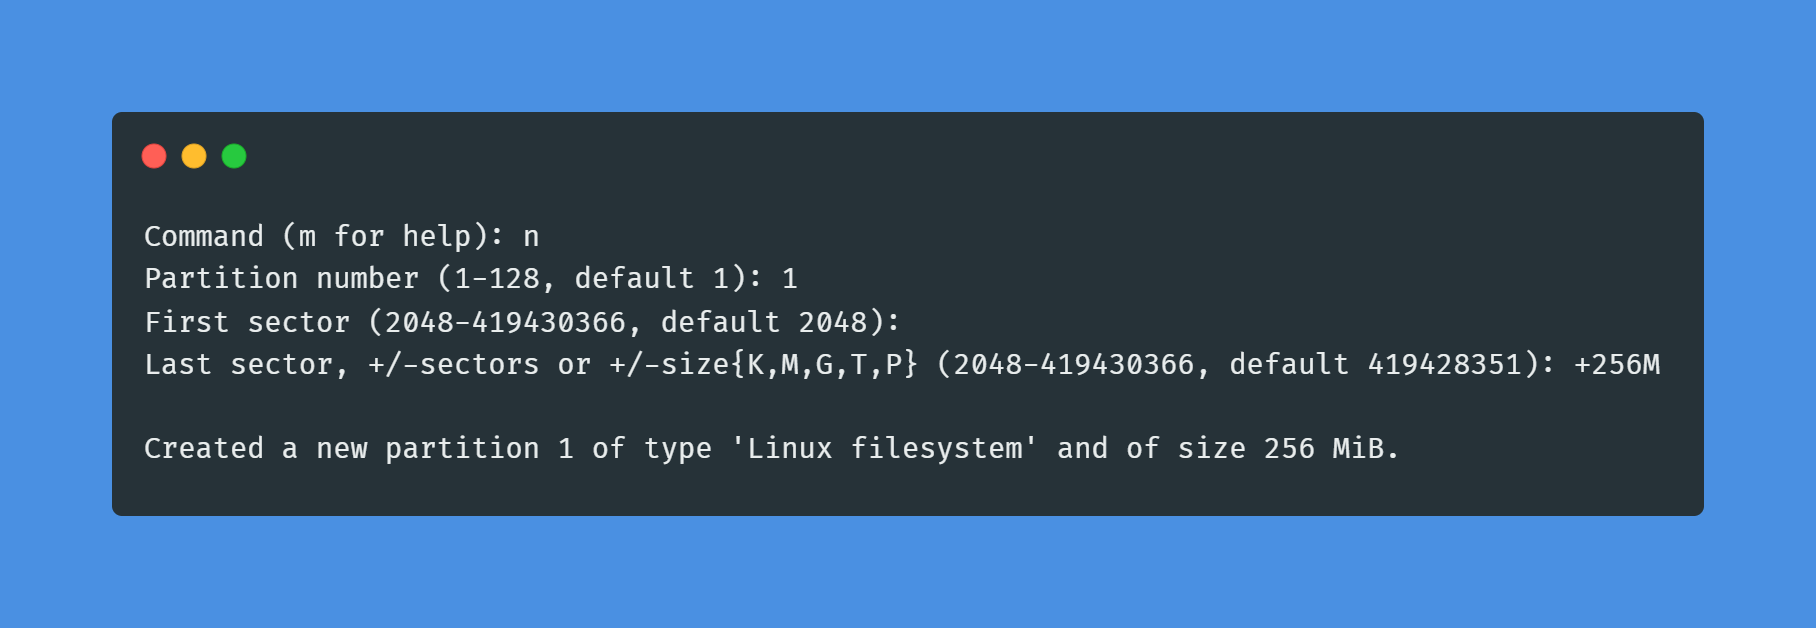
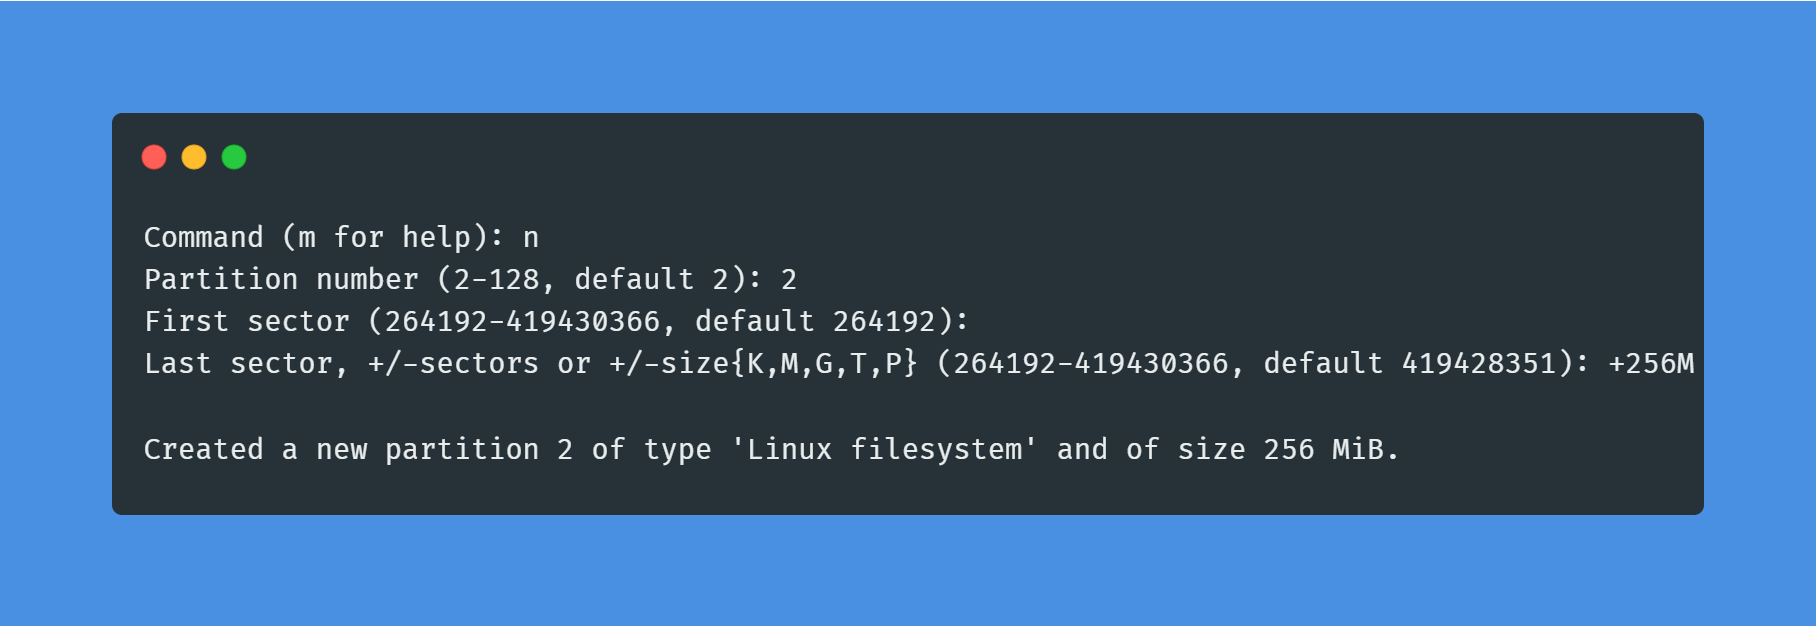
After that create a boot partition, which will also be mounted as /boot. Type n to create a new partition, followed by 2 to create the second partition, /dev/nvme0n1p2. When prompted for the first sector, hit Enter. When prompted for the last sector, type +256M to create a partition 256 Mbyte in size:
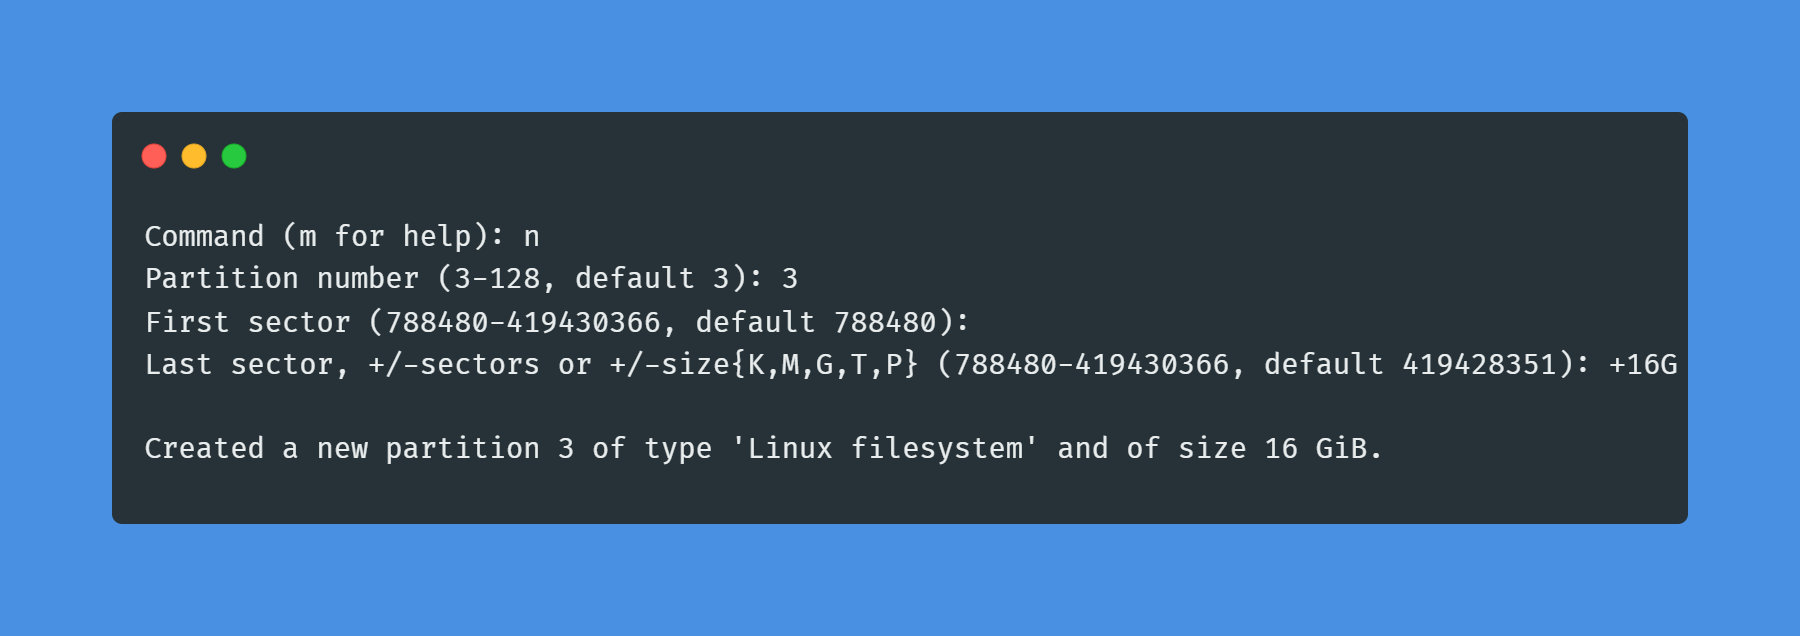
Next, to create the swap partition, type n to create a new partition, then type 3 to create the third partition, /dev/nvme0n1p3. When prompted for the first sector, hit Enter. When prompted for the last sector, type +16G (or any other size needed for the swap space) to create a partition 16GB in size.
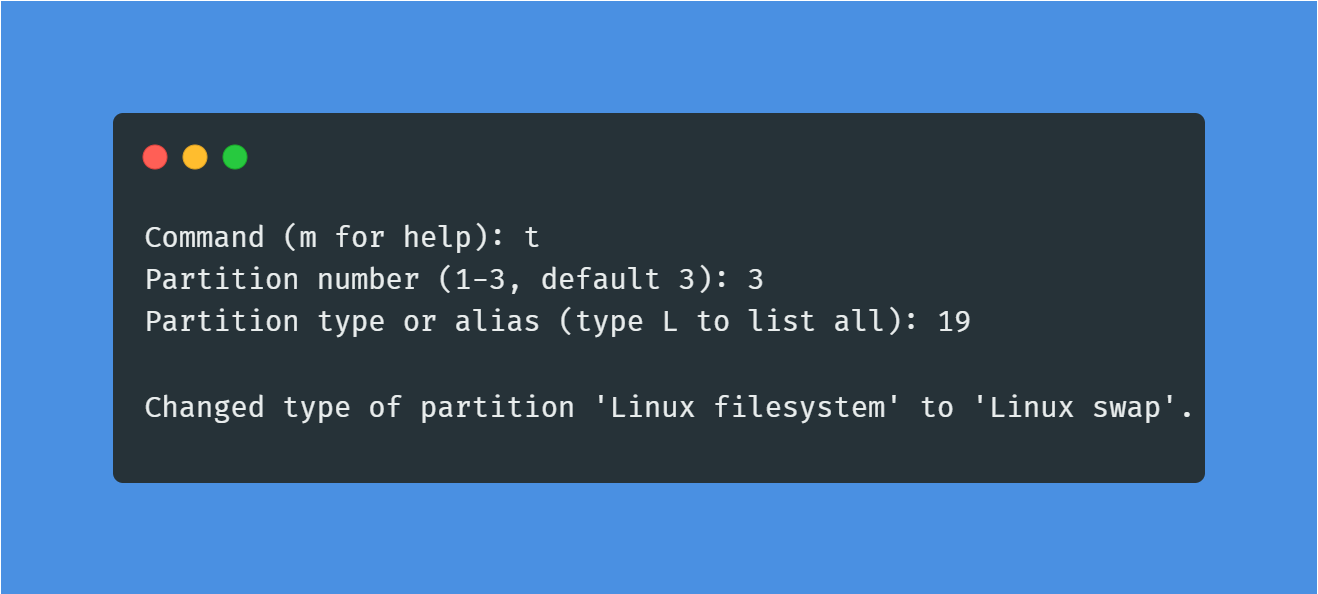
After all this is done, type t to set the partition type, 3 to select the partition just created and then type in 19 to set the partition type to "Linux Swap".
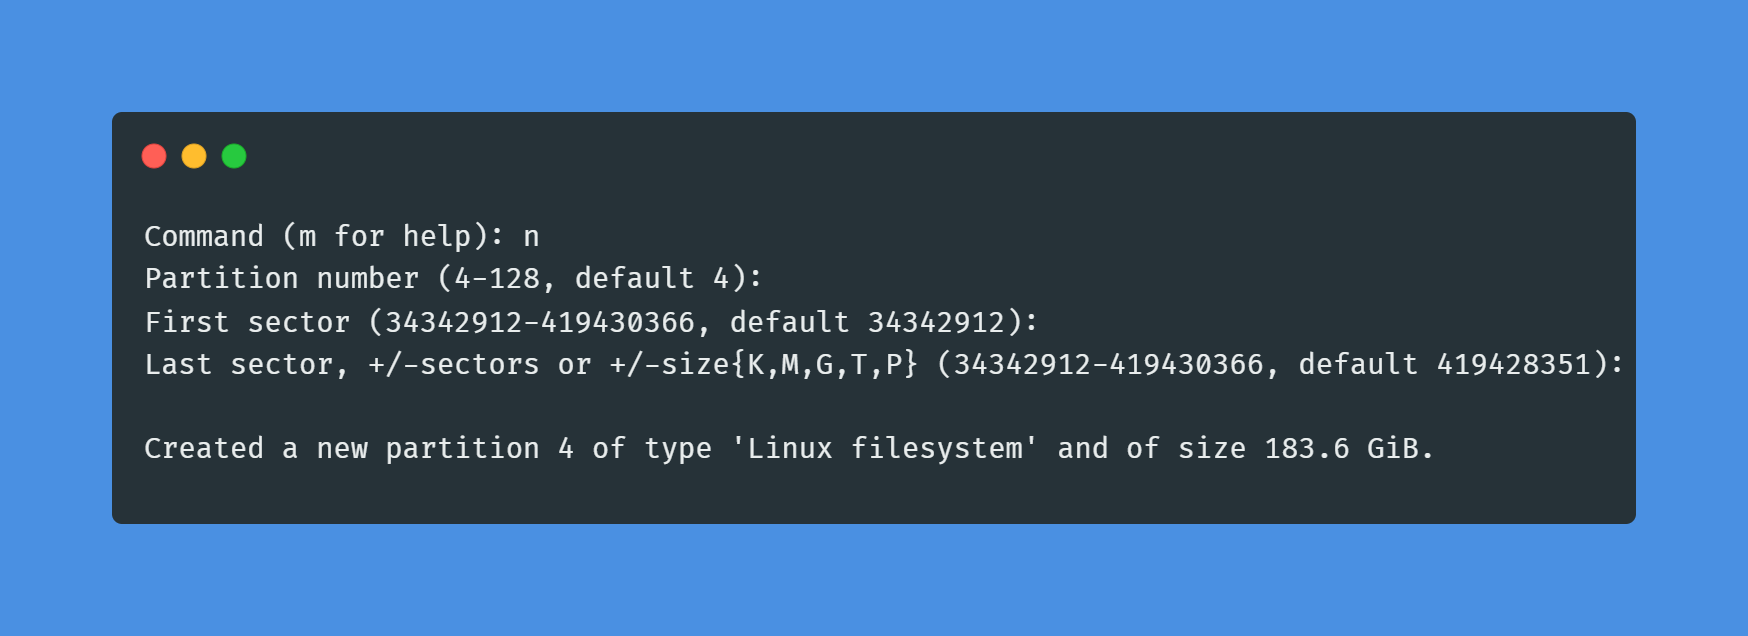
Finally, to create the root partition, type n to create a new partition. Then type 3 to create the third partition, /dev/nvme0n1p4. When prompted for the first sector, hit Enter. When prompted for the last sector, hit Enter to create a partition that takes up the rest of the remaining space on the disk.
After completing these steps, typing p should display a partition table that looks similar to this:
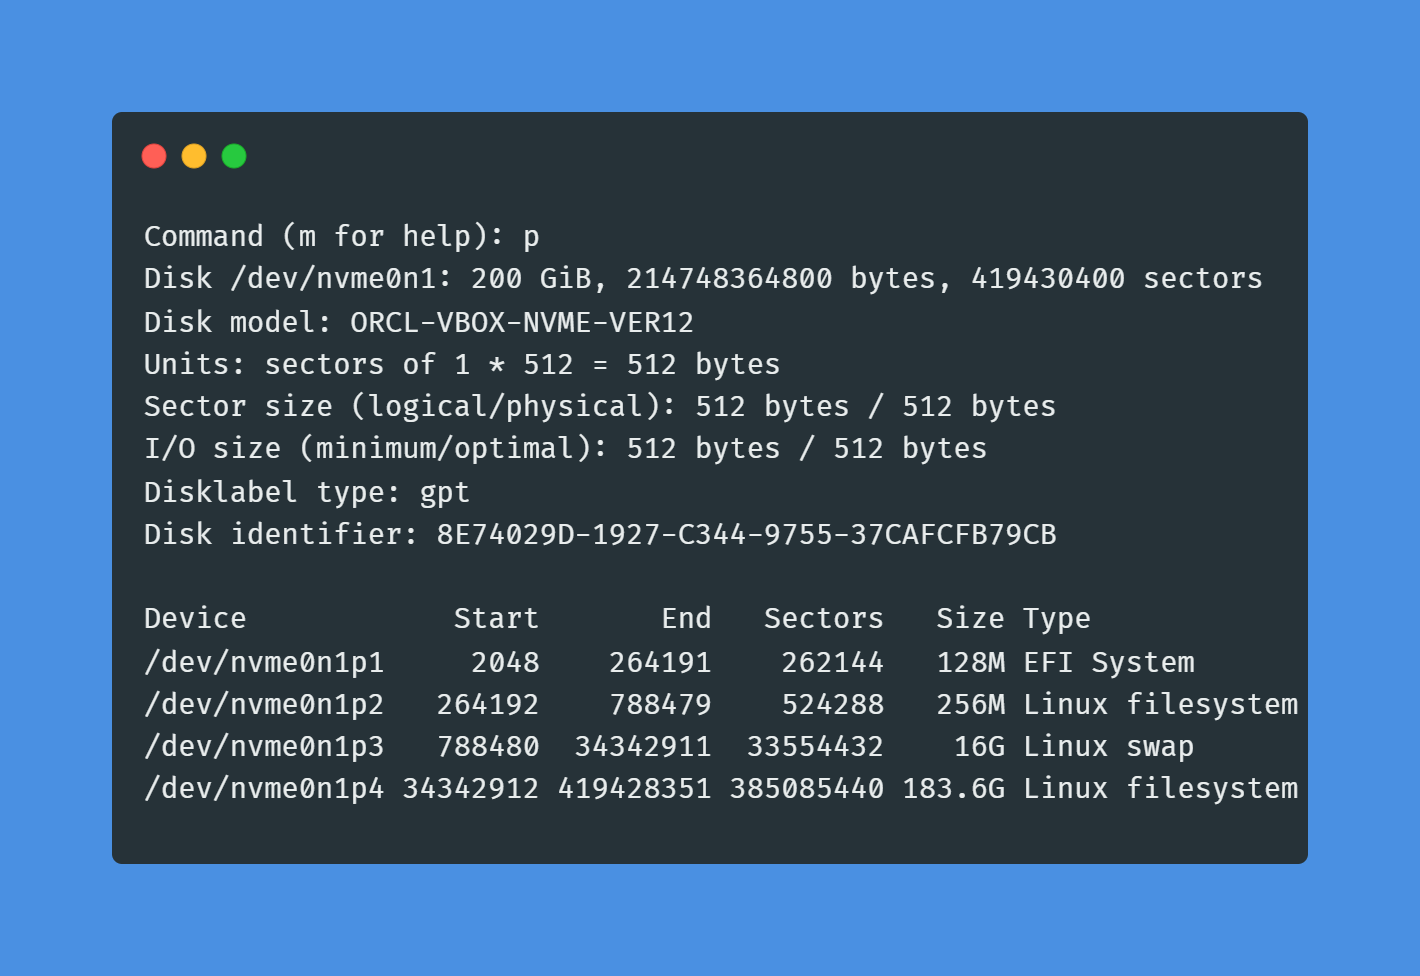
To save the partition layout and exit fdisk, type w.

Creating File Systems
Create FAT32 filesystem on the EFI system partition (/dev/nvme0n1p1).
mkfs.vfat -F 32 /dev/nvme0n1p1Create ext4 filesystem on the boot partition (/dev/nvme0n1p2).
mkfs.ext4 /dev/nvme0n1p2Create swap area on the swap partition.
mkswap /dev/nvme0n1p3Activate the swap partition:
swapon /dev/nvme0n1p3Create ext4 filesystem on the root partition (/dev/nvme0n1p4).
mkfs.ext4 /dev/nvme0n1p4Mounting File Systems
Create a mount point for the root partition.
mkdir --parents /mnt/gentooThen we mount the root partition on /mnt/gentoo.
mount /dev/nvme0n1p4 /mnt/gentooGo to the Gentoo mount point where the root file system is mounted.
cd /mnt/gentooDownload the stage tarball that is intended for AMD64-compatible processors and using Glibc as C library, GCC as C Compiler, and OpenRC as service manager. Use the wget utility to proceed:
wget https://bouncer.gentoo.org/fetch/root/all/releases/amd64/autobuilds/20230521T160357Z/stage3-amd64-openrc-20230521T160357Z.tar.xzNow unpack the downloaded stage onto the system. Use the tar utility to proceed:
tar xpvf stage3-*.tar.xz --xattrs-include='*.*' --numeric-ownerThe x stands for extract, the p for preserve permissions and the f to denote that we want to extract a file (not standard input). --xattrs-include='*.*' is to include preservation of the the extended attributes in all namespaces stored in the archive. Finally, --numeric-owner is used to ensure that the user and group IDs of the files being extracted from the tarball will remain the same as Gentoo's release engineering team intended.
The stage tarball file is a tarball containing a populated directory structure from Linux Filesystem. The tarball contains no kernel, only binaries and libraries essential to bootstrapping.
Next we mount the boot partition on /mnt/gentoo/boot.
mount /dev/nvme0n1p2 /mnt/gentoo/bootCreate a mount point for the efi system partition.
mkdir /mnt/gentoo/boot/efiAfter that we mount the efi system partition on /mnt/gentoo/boot/efi.
mount /dev/nvme0n1p1 /mnt/gentoo/boot/efiThe organization of the Linux Filesystem is defined by the Filesystem Hierarchy Standard. This standard enables Software and users to predict the location of installed files and directories. We will just indicates to what use are the first level directories are intended for:
/is the root. It is the highest level of the filesystem. At the very beginning of the filesystem setting up, this directory — as some other sub directories — is purely virtual (residing in RAM), then the partition that contains the final root of the filesystem is mounted there read-only. Thus the kernel is able to find the tools necessary to the initialization of disks and the mounting of the other partitions. After this job is done, the partition is remounted read write./homeis the place where the files of the users will be placed. Generally, but it is not mandatory, a separate partition is mounted there./etcis the place for installed application configuration files e.g./etc/fstab,/etc/hosts, etc./libis the place for shared libraries and the kernel modules./mediais a mounting point for removable devices such as CDs, DVDs, USB stick or drives, etc./binis a place for essential command binaries such as cat, ls, mount, etc./bootis a place for static files of the boot loader./devis for the device files./mntis a place where to mount filesystems temporarily./optis for additional programs./runis for data related to running processes./sbinis for essential commands./srvis for the data of services supported by the system e.g. the files of a web server./tmpis for temporary files./usris a secondary hierarchy./varis for variable data./rootis for the files belonging to the super user (root).
Portage is the official package manager and distribution system for Gentoo. Portage reads in the make.conf file when it runs, which will change runtime behavior depending on the values saved in the file. make.conf can be considered the primary configuration file for Portage.
Update the /mnt/gentoo/etc/portage/make.conf file.
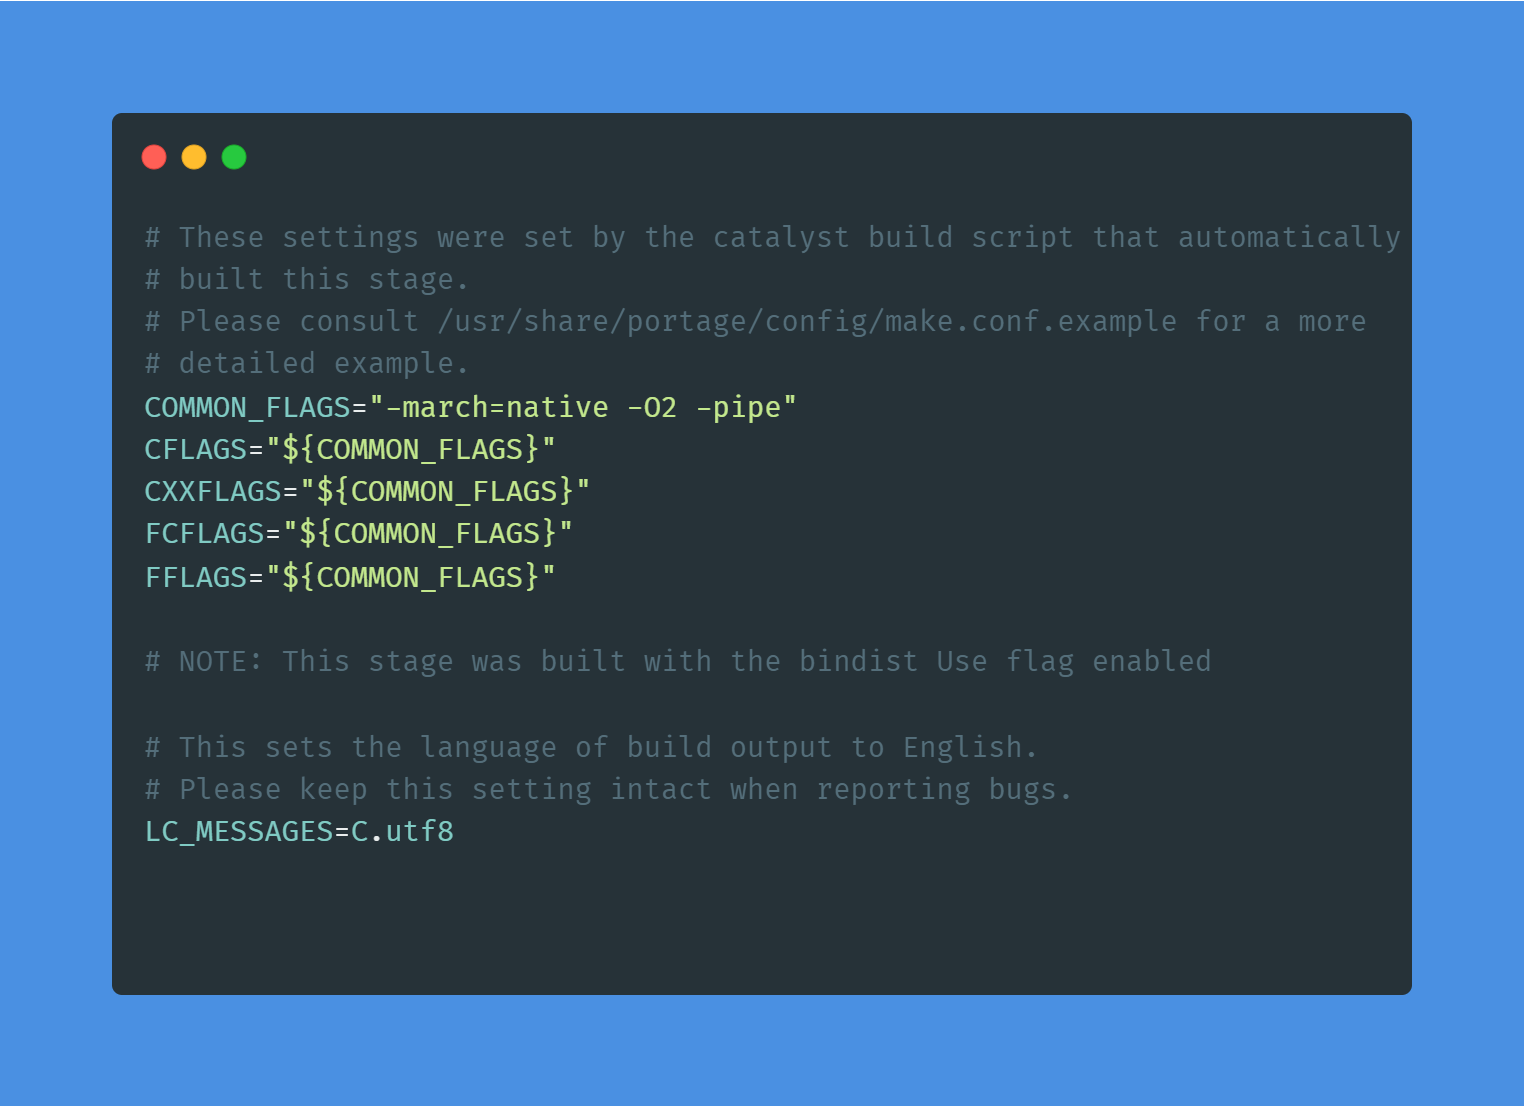
The CFLAGS and CXXFLAGS variables define the optimization flags for GCC C and C++ compilers respectively.
A first setting is the -march= or -mtune= flag, which specifies the name of the target architecture. A commonly used value is native as that tells the compiler to select the target architecture of the current system
A second one is the -O flag (that is a capital O, not a zero), which specifies the gcc optimization class flag. Possible classes are s (for size-optimized), 0 (zero - for no optimizations), 1, 2 or even 3 for more speed-optimization flags (every class has the same flags as the one before, plus some extras). -O2 is the recommended default. -O3 is known to cause problems when used system-wide
Another popular optimization flag is -pipe (use pipes rather than temporary files for communication between the various stages of compilation). It has no impact on the generated code, but uses more memory. On systems with low memory, gcc might get killed. In that case, do not use this flag.
Next step is to configure the Gentoo ebuild repository via the /etc/portage/repos.conf/gentoo.conf file. This file contains the sync information needed to update the package repository (the collection of ebuilds and related files containing all the information Portage needs to download and install software packages).
Configuring the repository can be done in a few simple steps. First, if it does not exist, create the repos.conf directory:
mkdir --parents /mnt/gentoo/etc/portage/repos.confNext, copy the Gentoo repository configuration file provided by Portage to the (newly created) repos.conf directory:
cp /mnt/gentoo/usr/share/portage/config/repos.conf /mnt/gentoo/etc/portage/repos.conf/gentoo.confNext thing to be done is copying over the DNS information in /etc/resolv.conf to the new environment. /etc/resolv.conf contains the name servers (DNS servers) for name resolution. Priorities to nameservers are given in the order the system finds an entry in the file.
cp --dereference /etc/resolv.conf /mnt/gentoo/etc/The --dereference option ensures that, if /etc/resolv.conf is a symbolic link, that the link's target file is copied instead of the symbolic link itself.
The Linux root will be changed towards the new location. The filesystems that need to be made available in the new environment are:
/proc/is a pseudo-filesystem. It looks like regular files, but is generated on-the-fly by the Linux kernel/sys/is a pseudo-filesystem, like/proc/which it was once meant to replace, and is more structured than/proc//dev/is a regular file system which contains all device. It is partially managed by the Linux device manager (usuallyudev)/run/is a temporary file system used for files generated at runtime, such as PID files or locks
The /proc/ location will be mounted on /mnt/gentoo/proc/ whereas the others are bind-mounted. For instance, /mnt/gentoo/sys/ will actually be /sys/ (it is just a second entry point to the same filesystem) whereas /mnt/gentoo/proc/ is a new mount of the filesystem.
mount --types proc /proc /mnt/gentoo/procmount --rbind /sys /mnt/gentoo/sysmount --make-rslave /mnt/gentoo/sysmount --rbind /dev /mnt/gentoo/devmount --make-rslave /mnt/gentoo/devmount --bind /run /mnt/gentoo/runmount --make-slave /mnt/gentoo/runNow that all partitions are initialized and the base environment installed, it is time to enter the new installation environment by chrooting into it. This means that the session will change its root from the current installation environment (installation CD) to the installation system (namely the initialized partitions).
First, we change root location from / (on the installation medium) to /mnt/gentoo/ (on the partitions) using chroot.
chroot /mnt/gentoo /bin/bashThen, reload /etc/profile in memory using the source command.
source /etc/profileChange primary prompt to help us remember that this session is inside a chroot environment.
export PS1="(chroot) ${PS1}"Configuring Portage
Next step is to install a snapshot of the Gentoo ebuild repository. This snapshot contains a collection of files that informs Portage about available software titles (for installation), which profiles the system administrator can select, package or profile specific news items, etc.
emerge-webrsyncDuring this operation, emerge-webrsync might complain about a missing /var/db/repos/gentoo/ location. This is to be expected and nothing to worry about - the tool will create the location.
Some architectures (including AMD64/X86, ARM, PPC) have a USE_EXPAND variable called CPU_FLAGS_ARCH (replace ARCH with the relevant system architecture as appropriate).
Install package app-portage/cpuid2cpuflags:
emerge --ask app-portage/cpuid2cpuflagsThen copy the output into package.use:
echo "*/* $(cpuid2cpuflags)" > /etc/portage/package.use/00cpu-flagsSetting Timezone
Select the timezone for the system. Look for the available timezones in /usr/share/zoneinfo/:
ls /usr/share/zoneinfoSuppose the timezone of choice is Asia/Jakarta.
We write the timezone name into the /etc/timezone file.
echo "Asia/Jakarta" > /etc/timezoneNext, reconfigure the sys-libs/timezone-data package, which will update the /etc/localtime, based on the /etc/timezone entry. The /etc/localtime file is used by the system C library to know the timezone the system is in.
emerge --config sys-libs/timezone-dataSetting Locale
Locales specify not only the language that the user should use to interact with the system, but also the rules for sorting strings, displaying dates and times, etc. Locales are case sensitive and must be represented exactly as described. A full listing of available locales can be found in the /usr/share/i18n/SUPPORTED file.
Supported system locales must be defined in the /etc/locale.gen file.
nano -w /etc/locale.genThe next step is to run the locale-gen command. This command generates all locales specified in the /etc/locale.gen file.
To display information about the current locales
locale -aKernel configuration
Before configuring kernel, it is important to be know that some hardware devices require additional firmware to be installed on the system before they will operate correctly. This is often the case for wireless network interfaces commonly found in both desktop and laptop computers. Modern video chips from vendors like AMD, Nvidia, and Intel, often also require external firmware files to be fully functional. Most firmware for modern hardware devices can be found within the sys-kernel/linux-firmware package.
Some packages will only be allowed to be installed by accepting its license. Update /etc/portage/make.conf and add the following variable:
ACCEPT_LICENSE="-* @FREE @BINARY-REDISTRIBUTABLE"Then we install the sys-kernel/linux-firmware package.
emerge --ask sys-kernel/linux-firmwareThere are two approach to configure and compile the kernel:
- Full automation approach: the linux kernel are fully automated in configuring, building, and installing. It is possible provide a custom kernel configuration file if customization is necessary.
- Full manual approach: the kernel is manually configured, built, and installed using the eselect kernel and a slew of
makecommands.
Full automation approach
Distribution Kernels are ebuilds that cover the complete process of unpacking, configuring, compiling, and installing the kernel.
Before installing the distribution kernels, first we install installkernel package:
emerge --ask sys-kernel/installkernel-gentooThen we install the distribution kernels:
emerge --ask sys-kernel/gentoo-kernel-binFull manual approach
First, install the sys-kernel/gentoo-sources package.
emerge --ask sys-kernel/gentoo-sourcesSetting the symlink with the eselect tool:
eselect kernel listeselect kernel set 1A symbolic link called linux is created.
ls -l /usr/src/linux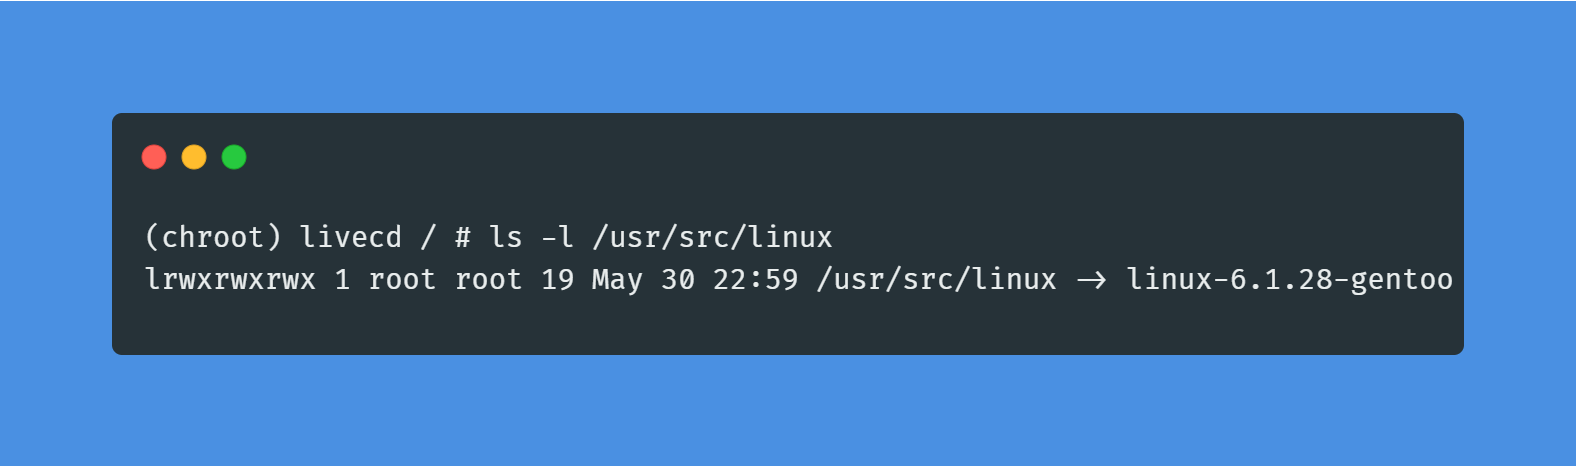
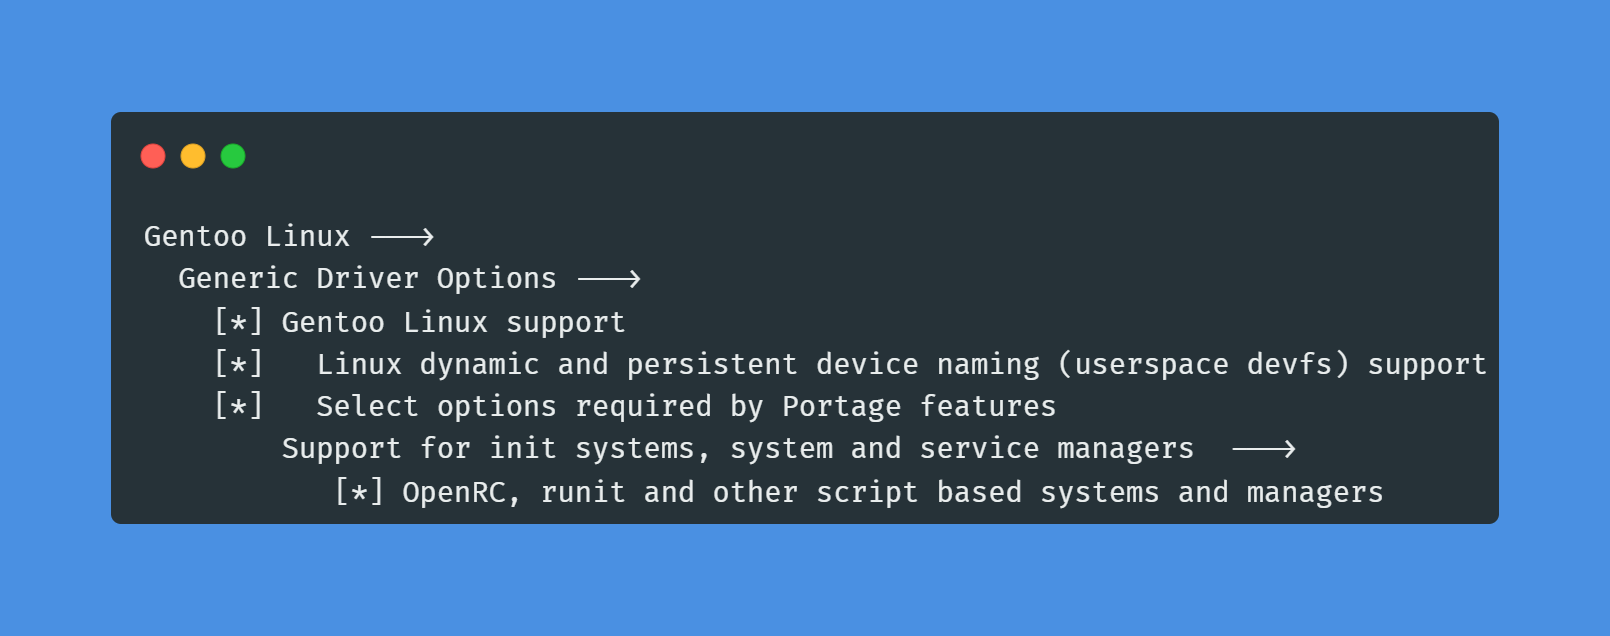
Now go to the kernel source directory and execute make menuconfig. This will fire up menu-driven configuration screen.
cd /usr/src/linuxmake menuconfigEnabling Gentoo-specific options and enabling openRC support:
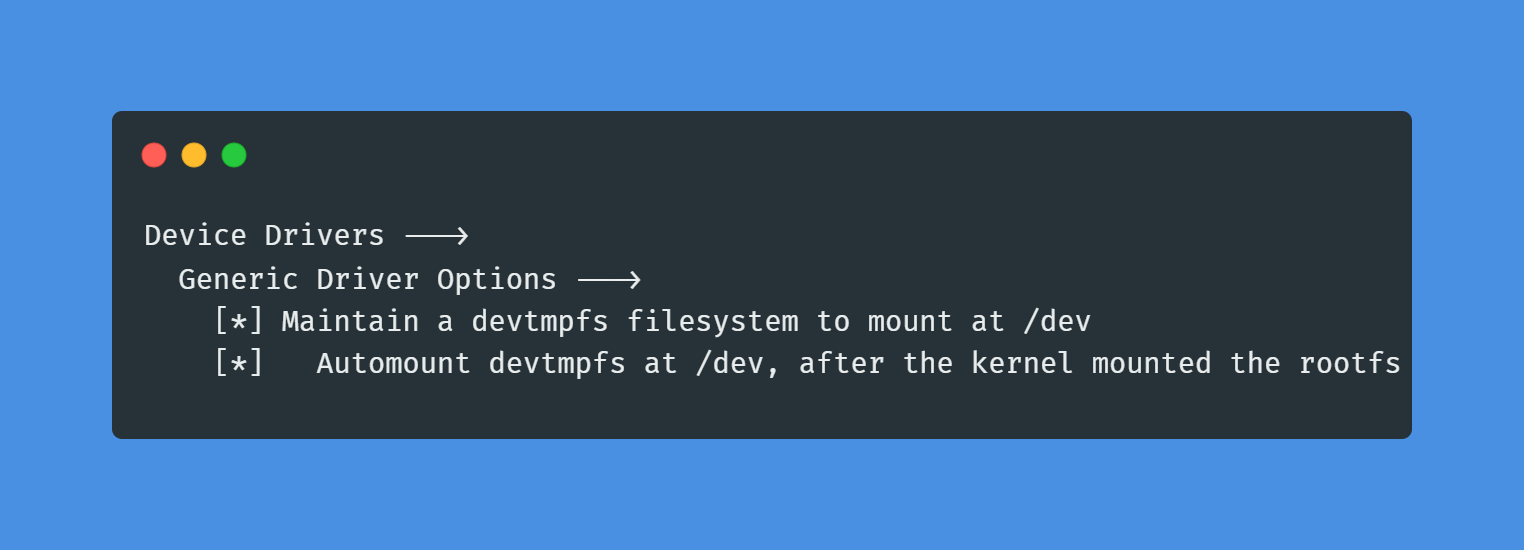
Enabling devtmpfs support (CONFIG_DEVTMPFS):
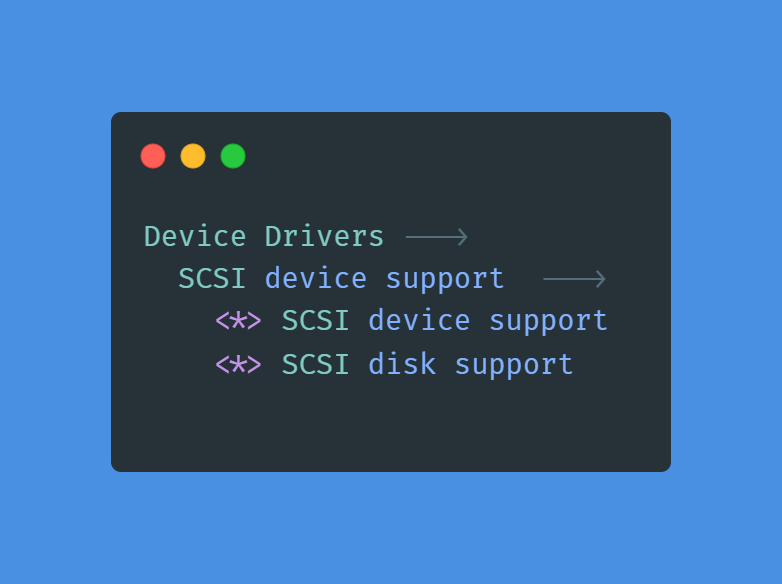
Enabling SCSI disk support (CONFIG_SCSI, CONFIG_BLK_DEV_SD):
Enabling basic SATA and PATA support (CONFIG_ATA_ACPI, CONFIG_SATA_PMP, CONFIG_SATA_AHCI, CONFIG_ATA_BMDMA, CONFIG_ATA_SFF, CONFIG_ATA_PIIX)

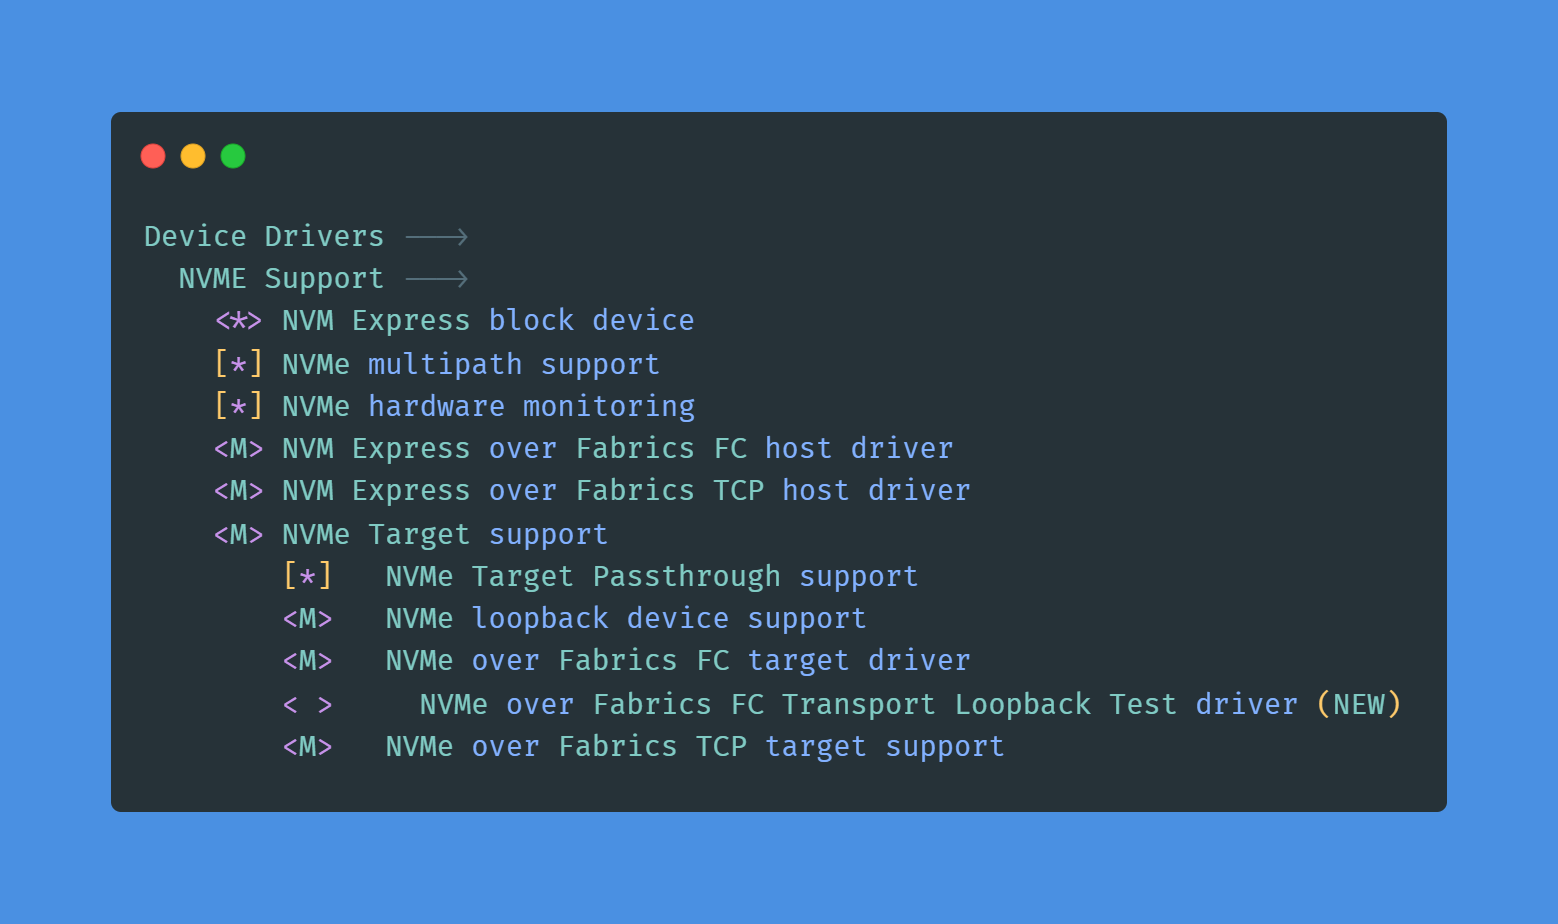
Enabling basic NVMe support (CONFIG_DEVTMPFS, CONFIG_NVME_MULTIPATH, CONFIG_NVME_MULTIPATH, CONFIG_NVME_HWMON, CONFIG_NVME_FC, CONFIG_NVME_TCP, CONFIG_NVME_TARGET, CONFIG_NVME_TARGET_PASSTHRU, CONFIG_NVME_TARGET_LOOP, CONFIG_NVME_TARGET_FC, CONFIG_NVME_TARGET_FCLOOP, CONFIG_NVME_TARGET_TCP)
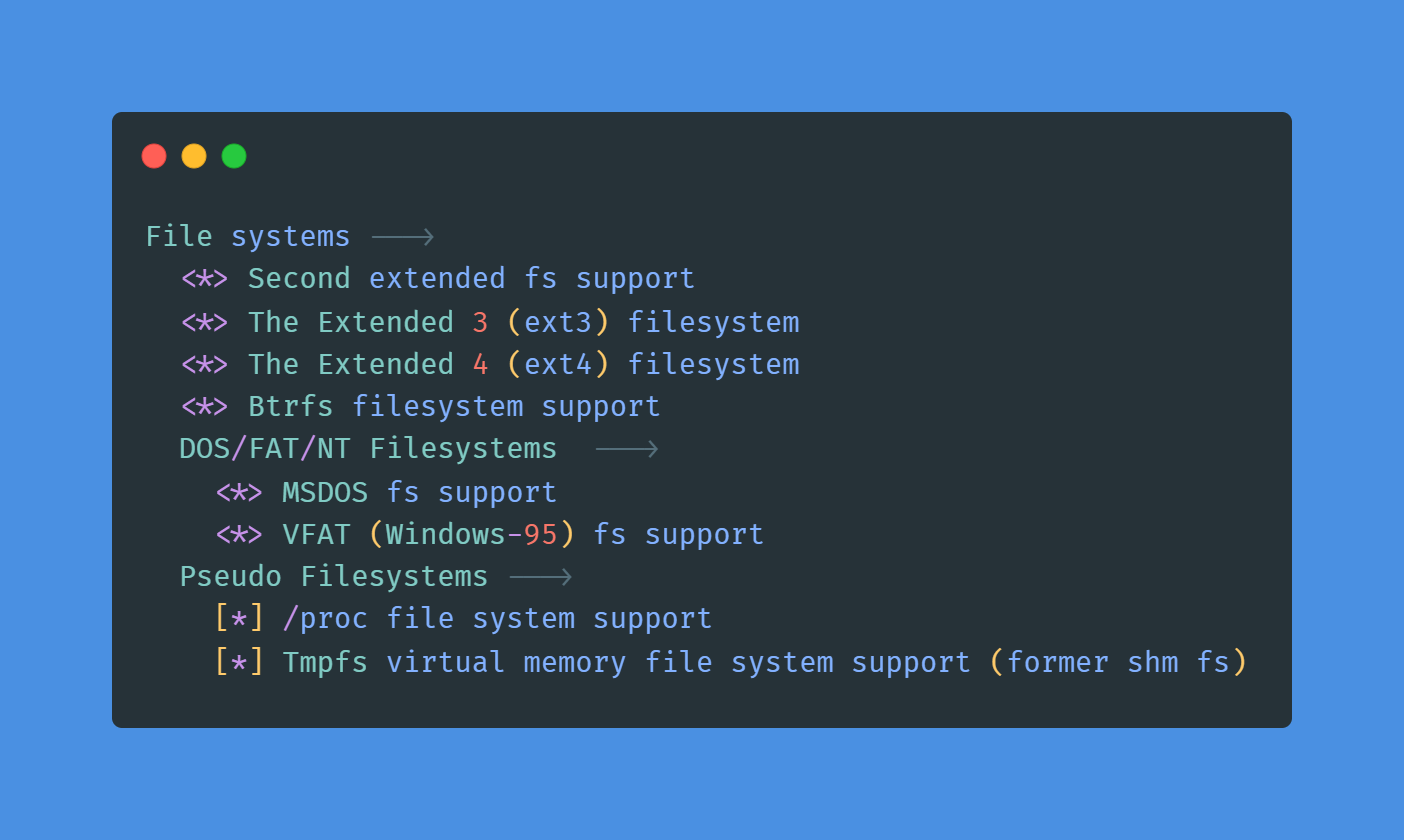
Enabling file system support (CONFIG_EXT2_FS, CONFIG_EXT3_FS, CONFIG_EXT4_FS, CONFIG_BTRFS_FS, CONFIG_MSDOS_FS, CONFIG_VFAT_FS, CONFIG_PROC_FS, and CONFIG_TMPFS)
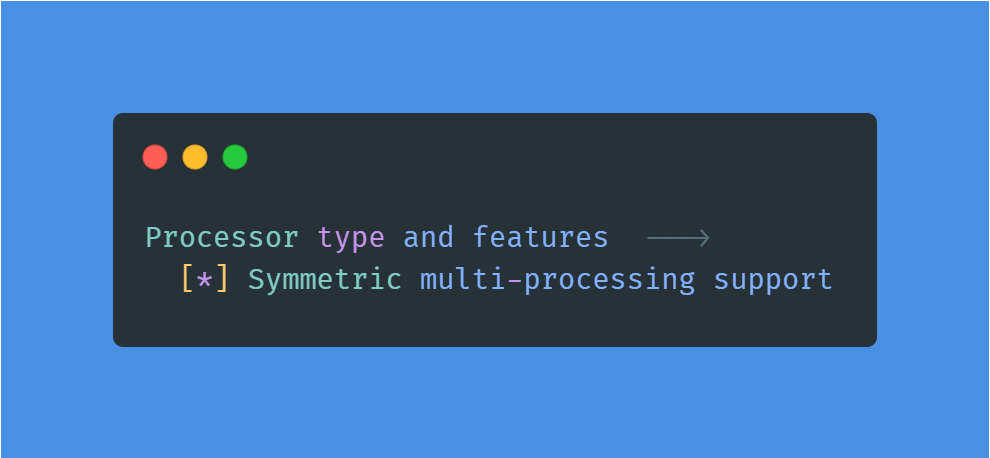
Activating SMP support (CONFIG_SMP)
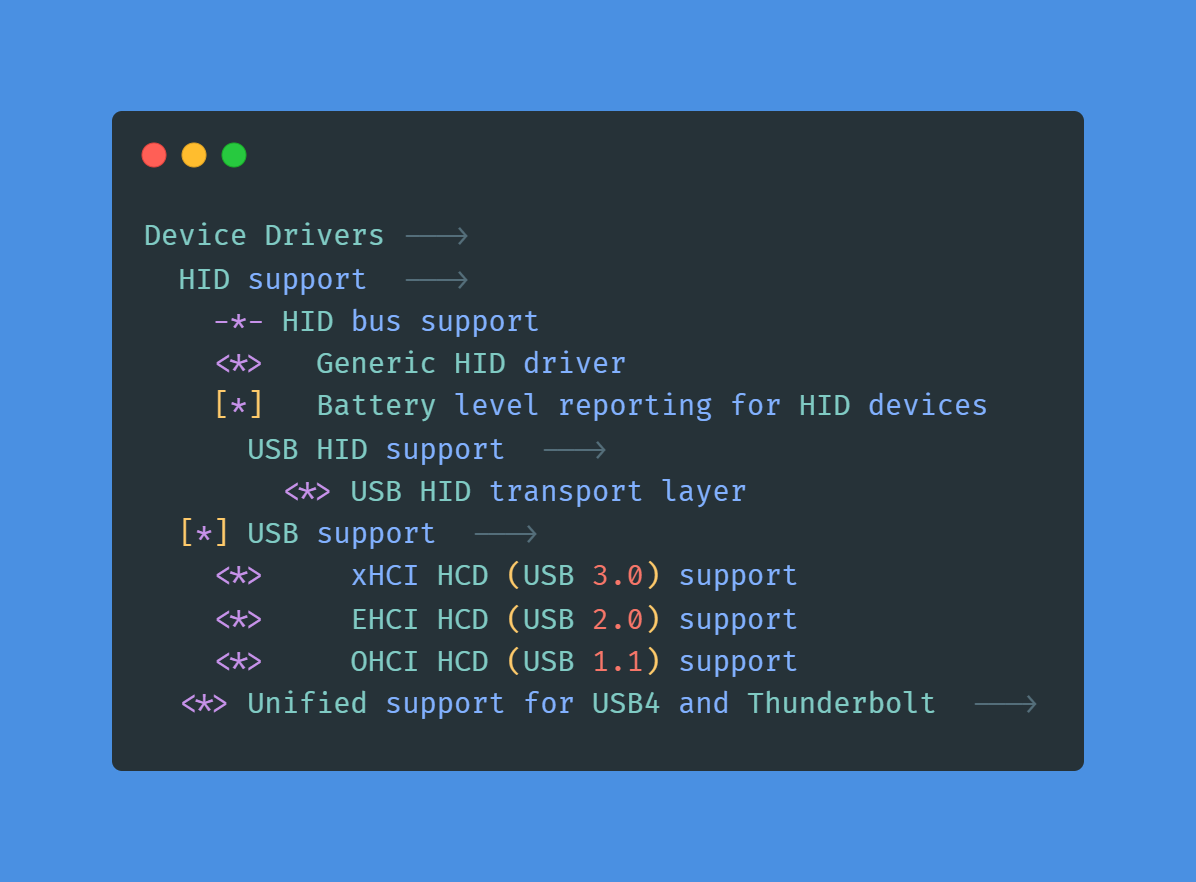
Enabling USB and human input device support (CONFIG_HID_GENERIC, CONFIG_USB_HID, CONFIG_USB_SUPPORT, CONFIG_USB_XHCI_HCD, CONFIG_USB_EHCI_HCD, CONFIG_USB_OHCI_HCD, (CONFIG_HID_GENERIC, CONFIG_USB_HID, CONFIG_USB_SUPPORT, CONFIG_USB_XHCI_HCD, CONFIG_USB_EHCI_HCD, CONFIG_USB_OHCI_HCD, CONFIG_USB4)
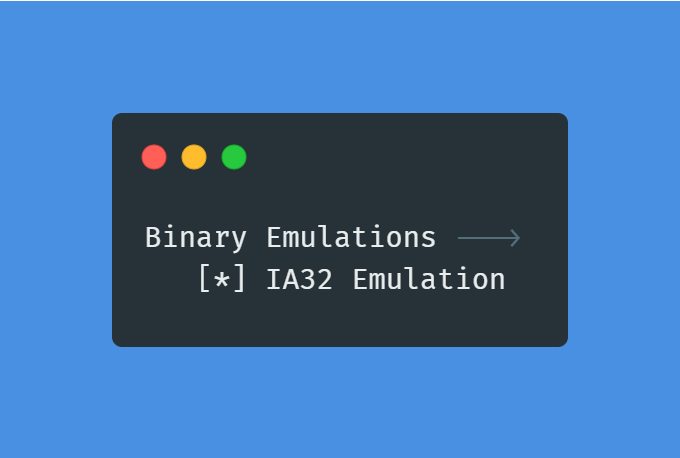
Enabling IA32 Emulation (CONFIG_IA32_EMULATION)
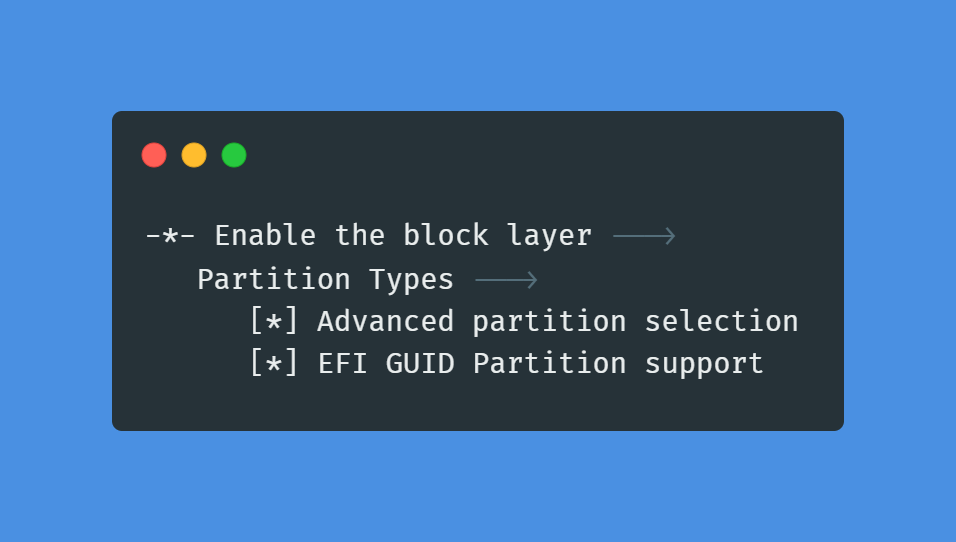
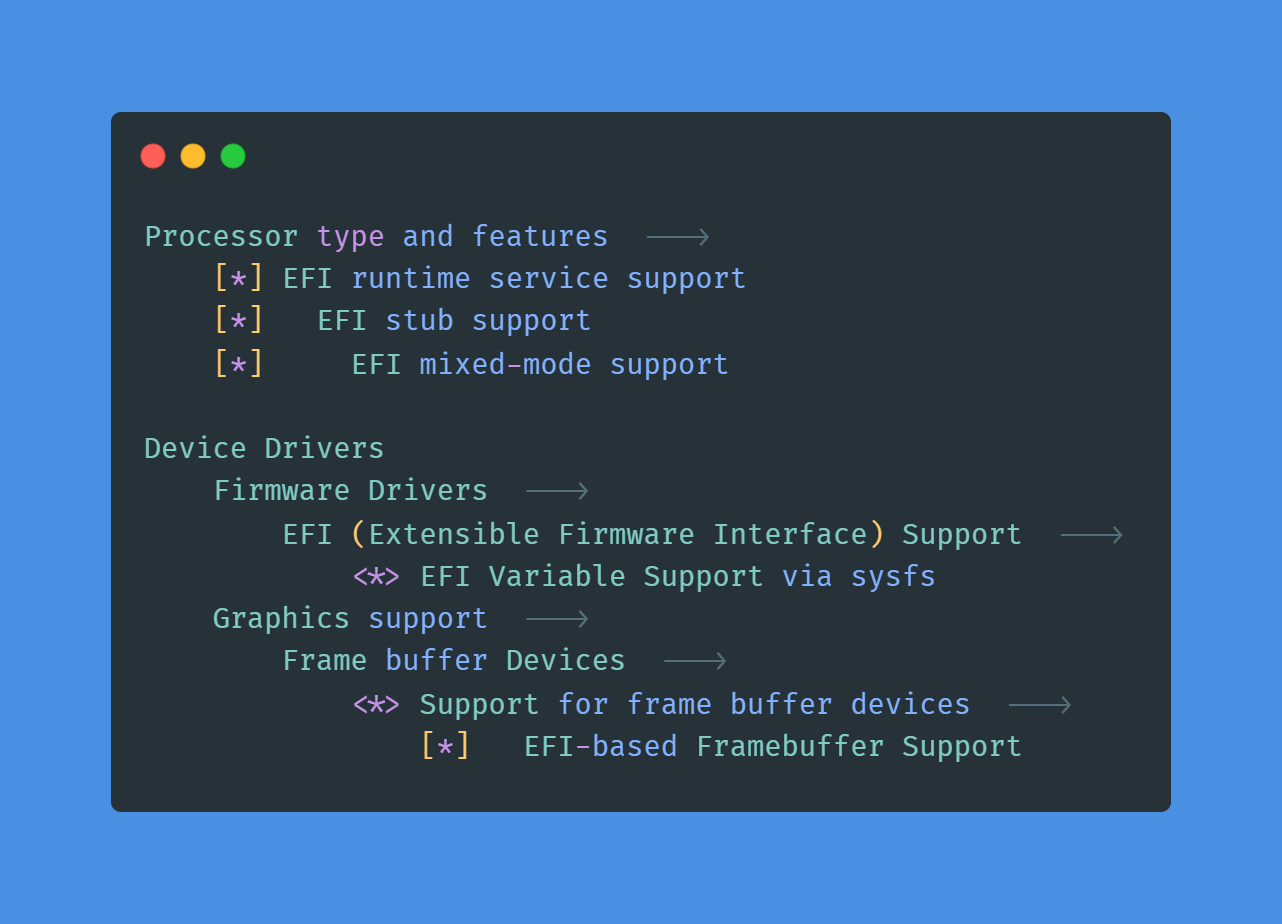
Enabling support for GPT (CONFIG_PARTITION_ADVANCED and CONFIG_EFI_PARTITION)
Enabling support for UEFI (CONFIG_EFI, CONFIG_EFI_STUB, CONFIG_EFI_MIXED, CONFIG_EFI_VARS, and CONFIG_FB_EFI)
With the configuration now done, it is time to compile and install the kernel. Exit the configuration and start the compilation process:
make && make modules_installWhen the kernel has finished compiling, copy the kernel image to /boot/. This is handled by the make install command:
make installTo build an initramfs, install sys-kernel/dracut package:
emerge --ask sys-kernel/dracutBefore we generate an initramfs, we must know the version of the chosen kernel sources. To check the version of the chosen kernel sources, enter:
eselect kernel listThis command must return the output similar to:
Available kernel symlink targets:
  [1]   linux-6.1.28-gentoo *
Then have it generate an initramfs:
dracut --kver=6.1.28-gentooThe initramfs will be stored in /boot/.
Creating the fstab file
Under Linux, all partitions used by the system must be listed in /etc/fstab. This file contains the mount points of those partitions, how they should be mounted and with what special options.
The /etc/fstab file uses a table-like syntax. Every line consists of six fields, separated by whitespace (space(s), tabs, or a mixture of the two). Each field has its own meaning:
- The first field shows the block special device or remote filesystem to be mounted. Several kinds of device identifiers are available for block special device nodes, including paths to device files, filesystem labels and UUIDs, and partition labels and UUIDs.
- The second field shows the mount point at which the partition should be mounted.
- The third field shows the type of filesystem used by the partition.
- The fourth field shows the mount options used by
mountwhen it wants to mount the partition. As every filesystem has its own mount options, so system admins are encouraged to read the mount man page (man mount) for a full listing. Multiple mount options are comma-separated. - The fifth field is used by dump to determine if the partition needs to be dumped or not. This can generally be left as
0(zero). - The sixth field is used by
fsckto determine the order in which filesystems should be checked if the system wasn't shut down properly. The root filesystem should have1while the rest should have2(or0if a filesystem check is not necessary).
Add these rules in the /etc/fstab file.
/dev/nvme0n1p2   /boot            ext4    defaults,noatime     0 2
/dev/nvme0n1p1   /boot/efi        vfat    defaults,noatime     0 2
/dev/nvme0n1p3   none             swap    sw                   0 0
/dev/nvme0n1p4   /                ext4    noatime              0 1
/dev/cdrom       /mnt/cdrom       auto    noauto,user          0 0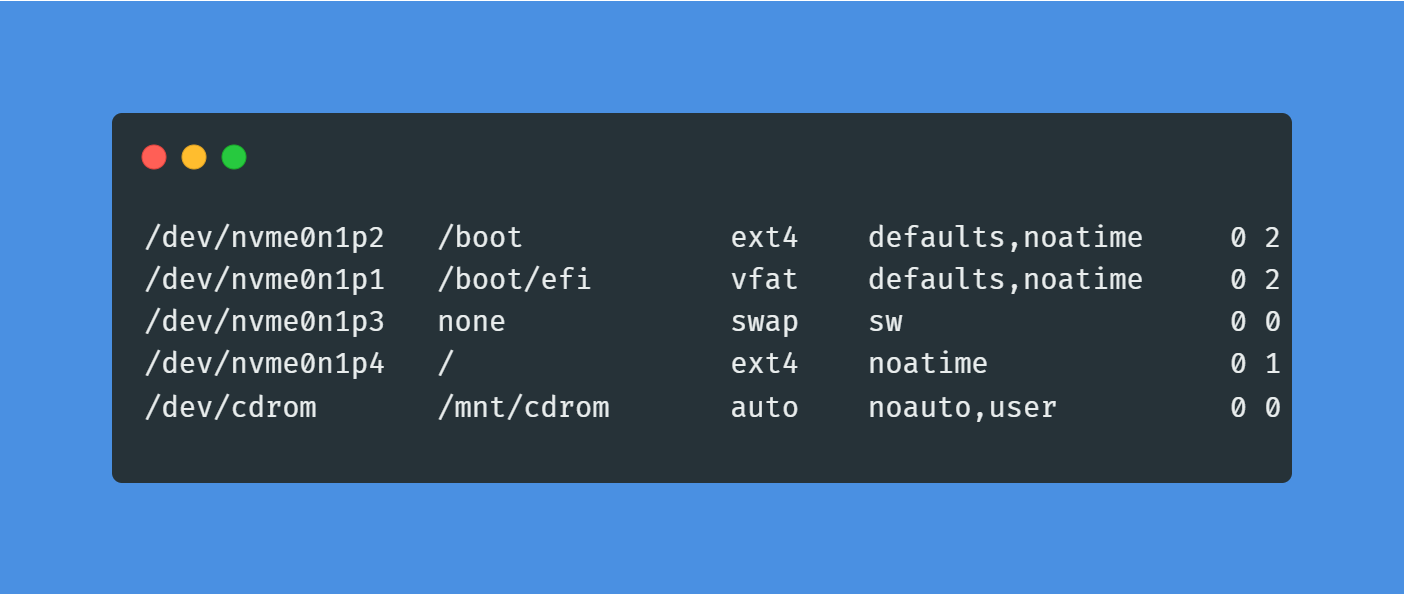
Setting the hostname
echo codingempire > /etc/hostnameConfiguring the network
First install net-misc/netifrc:
emerge --ask --noreplace net-misc/netifrcnet-misc/netifrc package needs net-misc/dhcpcd to obtain an IP address.
emerge --ask --noreplace net-misc/dhcpcdThen we list all available physical network interfaces:
find /sys/class/net -type l -not -lname '*virtual*' -printf '%f\n'The -type l option tells to look for symbolic links.
The -lname '*virtual*' option tells to ignore the path that contains the virtual string.
The -printf '%f\n' option tells to print only the basename of the path.
The output of the command must show that at least one physical network interface is found:
enp0s3Then we create /etc/conf.d/net file.
touch /etc/conf.d/netNext we set DHCP on that physical network interface. Add these rules in the /etc/conf.d/net file.
config_enp0s3="dhcp"Now that the interface name is determined and configuration is done in /etc/conf.d/net, the service script must be created by creating a symlink to /etc/init.de/net.lo:
ln -s /etc/init.d/net.lo /etc/init.d/net.enp0s3Finally, enable it at boot:
rc-update add net.enp0s3 defaultSetting hosts file
/etc/hosts helps in resolving host names to IP addresses for hosts that aren't resolved by the nameserver.
Setting root user profile
Create a root user profile:
touch ~/.profileThen add the PS1 variable in the .profile file:
PS1='\u@\h:\w\$ 'Setting root password
Set the root password using the passwd command.
passwdInit and boot configuration
When using OpenRC with Gentoo, it uses /etc/rc.conf to configure the services, startup, and shutdown of a system.
nano /etc/rc.confNext, open /etc/conf.d/keymaps to handle keyboard configuration. Edit it to configure and select the right keyboard.
nano /etc/conf.d/keymapsFinally, edit /etc/conf.d/hwclock to set the clock options. If the hardware clock is not using UTC, then it is necessary to set clock="local" in the file.
nano /etc/conf.d/hwclockSystem logger
Install and activate app-admin/sysklogd as the system's syslog utility:
emerge --ask app-admin/sysklogdrc-update add sysklogd defaultCron daemon
A cron daemon executes commands on scheduled intervals. Internals could be daily, weekly, or monthly, once every Tuesday, once every other week, etc.
All cron daemons support high levels of granularity for scheduled tasks, and generally include the ability to send an email or other form of notification if a scheduled task does not complete as expected.
Install and activate sys-process/cronie:
emerge --ask sys-process/cronierc-update add cronie defaultFile indexing
In order to index the file system to provide faster file location capabilities, install sys-apps/mlocate.
emerge --ask sys-apps/mlocateRemote shell access
Change SSH Configuration file (/etc/ssh/sshd_config), uncomment the Port option to enable SSH client connects to SSH server on port 22.
Port 22Uncomment the PermitRootLogin option and set the value to yes to enable root login.
PermitRootLogin yesTo add the sshd init script to the default runlevel on OpenRC:
rc-update add sshd defaultTime synchronization
Install and activate net-misc/chrony:
emerge --ask net-misc/chronyrc-update add chronyd defaultConfiguring the GRUB bootloader
The boot loader is responsible for firing up the Linux kernel upon boot - without it, the system would not know how to proceed when the power button has been pressed.
A note for UEFI users: running the above command will output the enabled GRUB_PLATFORMS values before emerging. When using UEFI capable systems, users will need to ensure GRUB_PLATFORMS="efi-64" is enabled. If that is not the case for the setup, GRUB_PLATFORMS="efi-64" will need to be added to the /etc/portage/make.conf file before emerging GRUB so that the package will be built with EFI functionality:
echo 'GRUB_PLATFORMS="efi-64"' >> /etc/portage/make.confemerge --ask sys-boot/grubNext, install the GRUB EFI file (grubx64.efi) to the /boot/efi/ directory via the grub-install command. Run grub-install command:
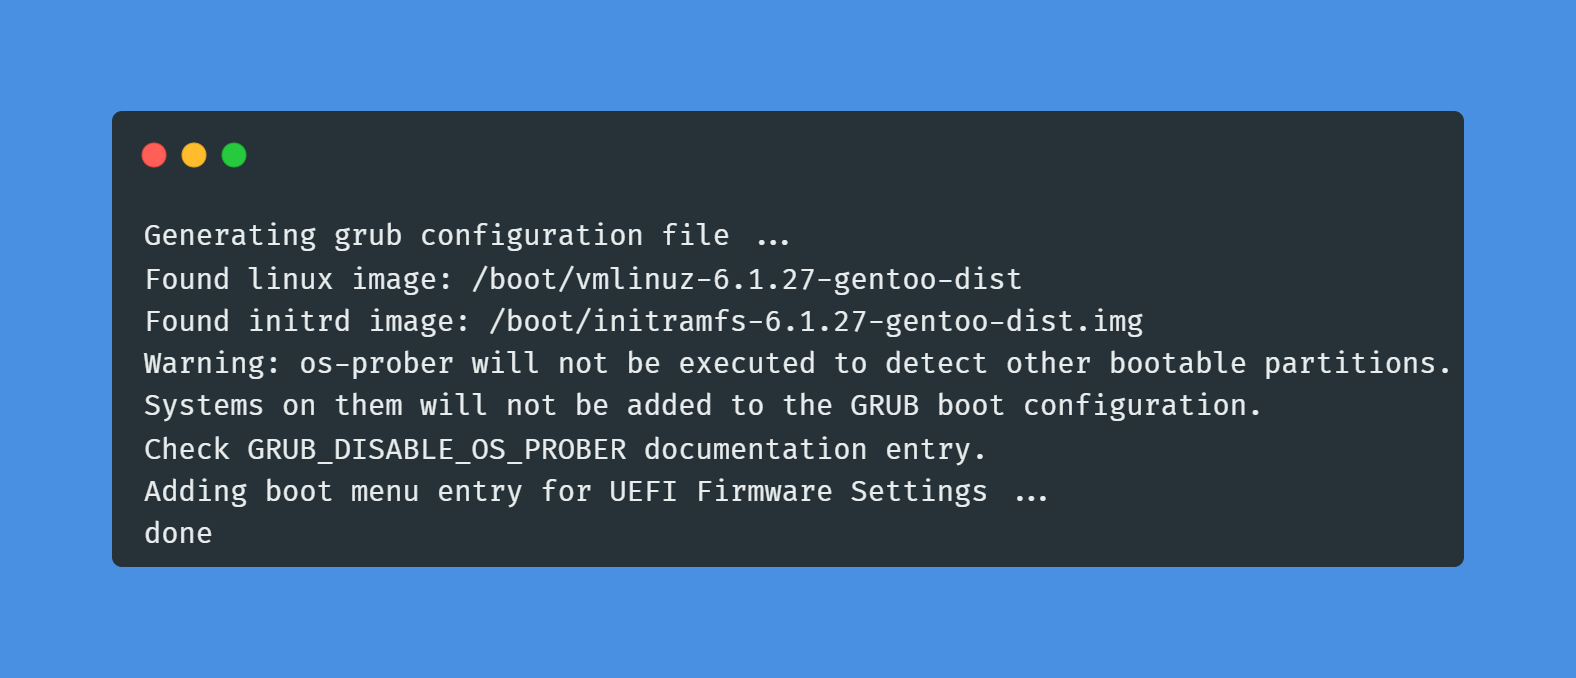
grub-install --target=x86_64-efi --efi-directory=/boot/efiNext, generate the GRUB configuration based on the user configuration specified in the /etc/default/grub file and /etc/grub.d scripts. Run the grub-mkconfig command:
grub-mkconfig -o /boot/grub/grub.cfgThe output of the command must mention that at least one Linux image is found, as those are needed to boot the system. If an initramfs is used, the correct initrd image should be detected as well.
Rebooting the system
Exit the chrooted environment and unmount all mounted partitions.
exitcdumount -l /mnt/gentoo/dev{/shm,/pts,}umount -R /mnt/gentooreboot