
Managing repository history is one of the critical parts of keeping your code base scalable. Many approaches might be helpful in one case and not work in another.
git rebase and git merge are two git utilities that are designed to combine commit history from one branch to another branch.
Git Merge
git merge is a command used to combine changes from two or more branches into a single branch. When a merge is performed, Git creates a new commit that incorporates the changes from both branches. The resulting commit history looks like a tree, with multiple branches merging into a single trunk.
To perform a merge, first, ensure you are on the branch that you want to merge changes into (e.g., main branch). Then, run the following command:
git merge <branch-name>where <branch-name> is the name of the branch containing the changes you want to merge. Git will create a new merge commit that combines the changes from both branches. If there are conflicts between the changes in the two branches, Git will prompt you to resolve them before the merge can be completed.
There are two types of merge:
- Fast-forward merge
- Three-way merge
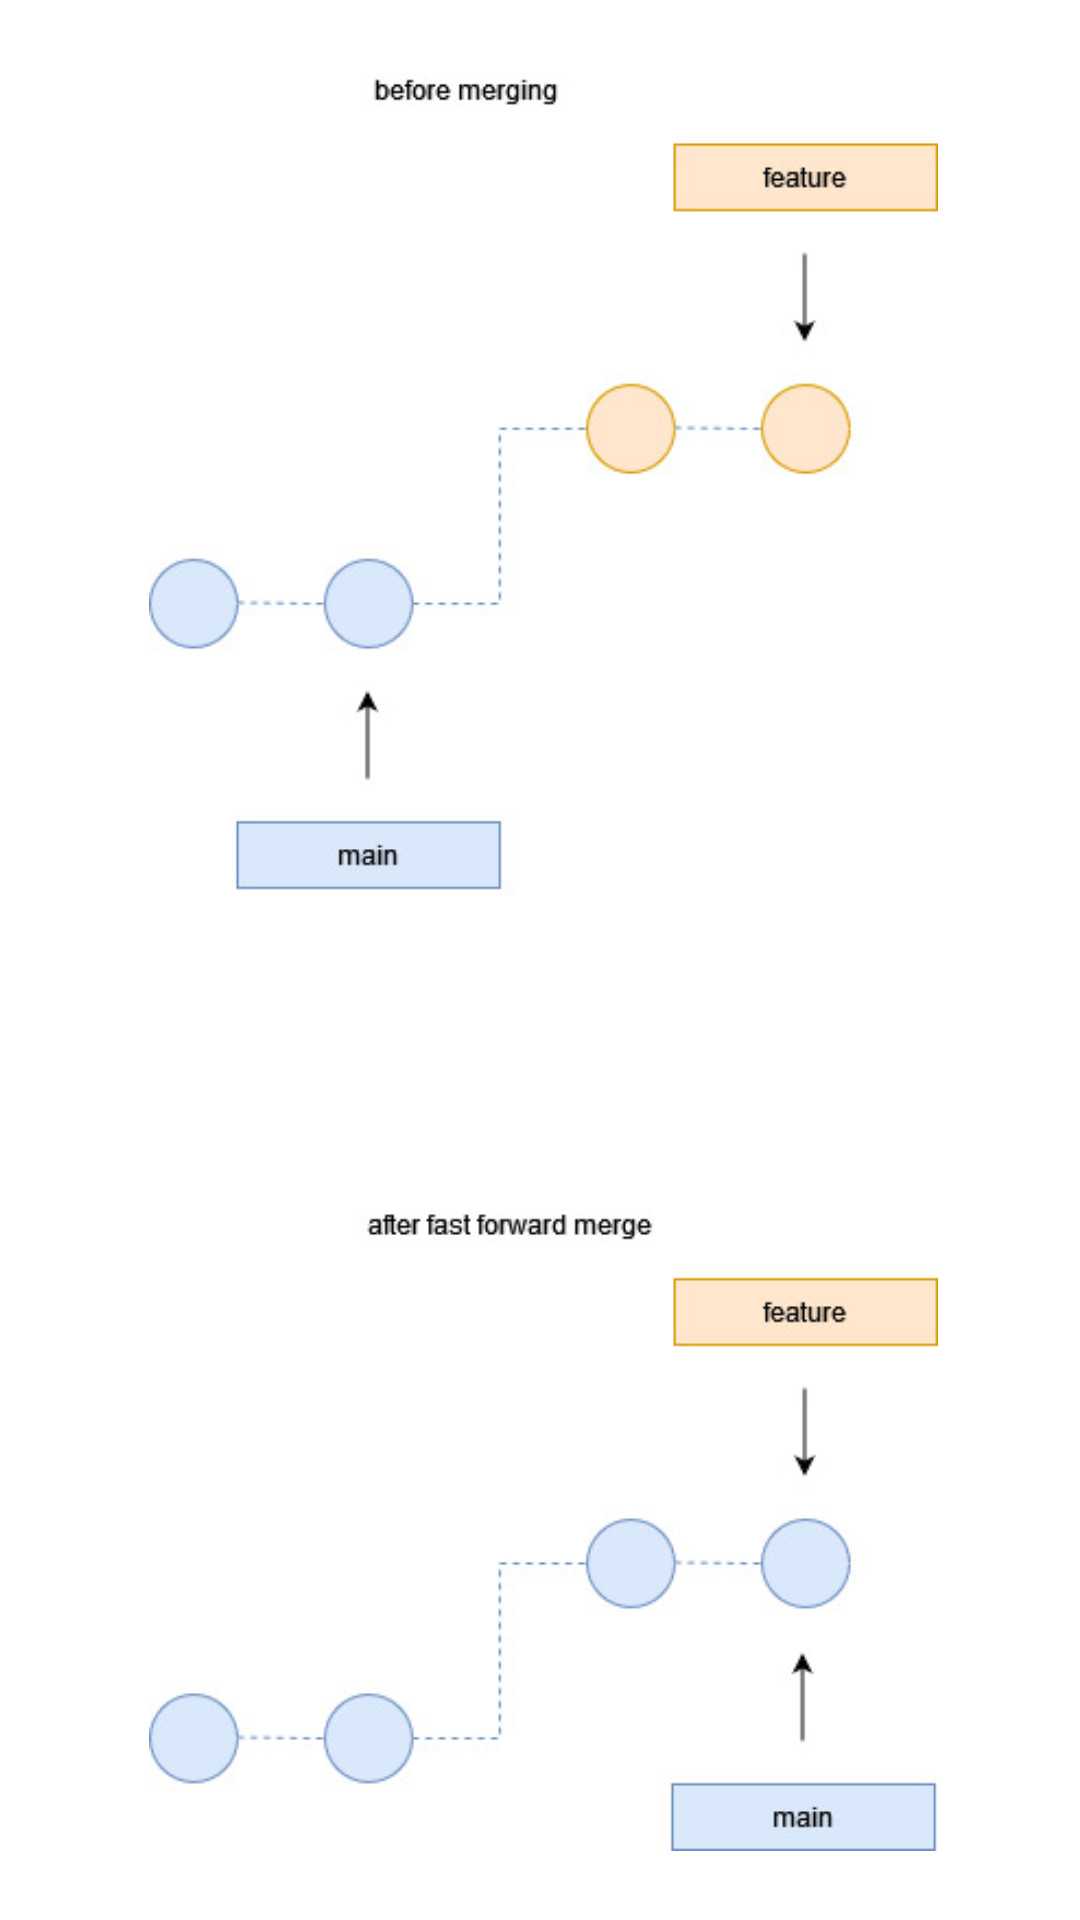
Fast-forward Merge
Imagine we are having two branches:
- Parent branch (
main) - Child branch (
feature)
We made changes and commits to the main branch.
At the second commit on main branch the feature branch got created, and then we made changes and commits to the feature branch only. We didn't make any changes and commits on the main branch.
If there will be only two branches main and feature, and no new changes and commits have been performed on your main branch since the feature branch got created in this case git will perform fast-forward merge.
In the Fast-forward merge, git simply moves the pointer from the main branch to the last commit of the feature branch.
In the Fast-forward merge, there is no chance of conflicts because the changes and commits are in the feature branch only, not on the main branch.
# make a repo directory
mkdir projecta && cd projecta

# initialize the repo and specify the initial branch name
git init --initial-branch=main

# add a file
touch home.html && echo "<h1>Header for homepage</h1>" > home.html

# add home.html to the Staging area
git add home.html

# commit that file to the Local Repository
git commit -m "commit 1"

# add some content to the home.html
echo "<p>content for homepage</p>" >> home.html

# add home.html to the Staging area
git add home.html

# commit that file to the Local Repository
git commit -m "commit 2"
Now, there are two commits available at the main branch. To confirm that we'll check the log using git log command
Now we'll create a feature branch and switch to feature branch.
git checkout -b feature# add some content again to the home.html
echo "<p>content 2 for homepage</p>" >> home.html
# add home.html to the Staging area
git add home.html
# commit that file to the Local Repository
git commit -m "commit 3"
# add some content again to the home.html
echo "<p>content 3 for homepage</p>" >> home.html
# add home.html to the Staging area
git add home.html
# commit that file to the Local Repository
git commit -m "commit 4"Now, there will be four commits available at the feature branch.
Next we'll merge the feature branch to the main branch.
Switch back to the main branch and merge the feature branch with the main branch.
# switch to main branch
git switch main

# merge feature branch to main branch
git merge feature
Now, there will be four commits available at the main branch.
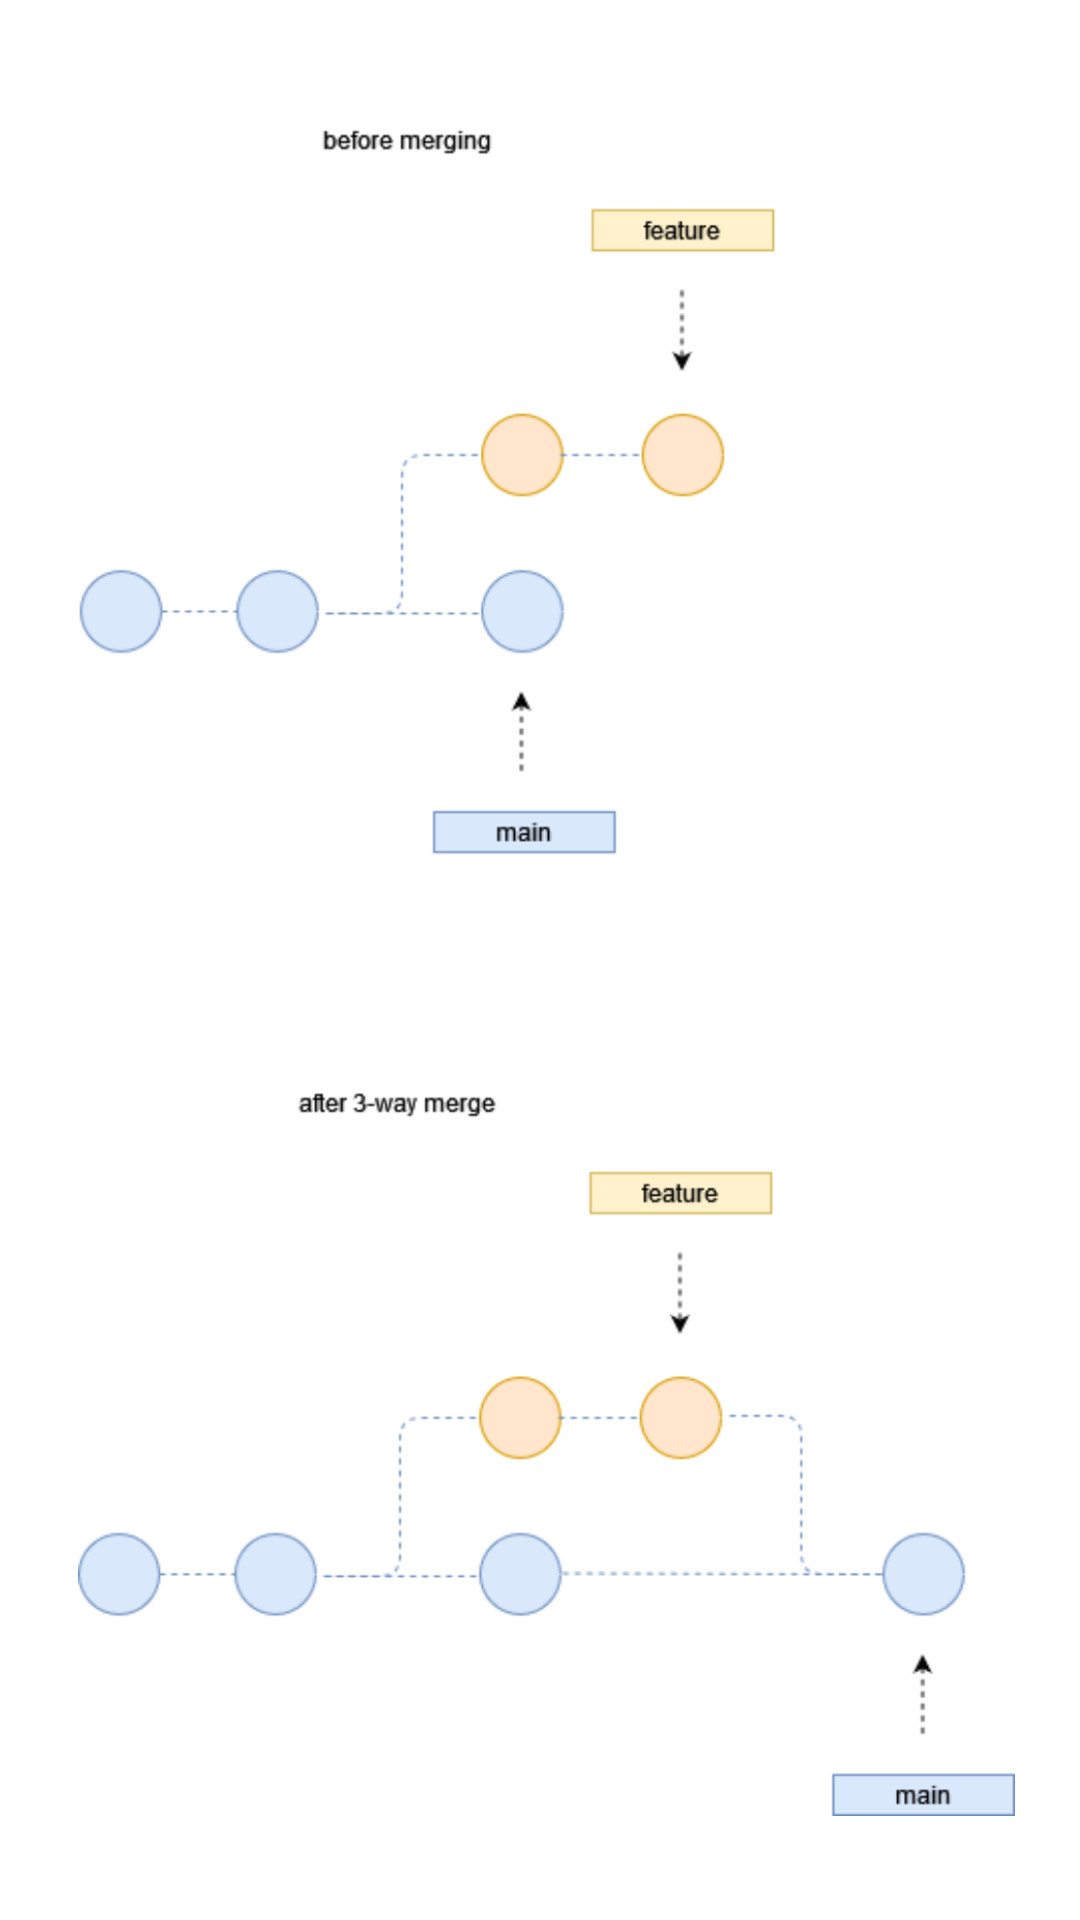
Three-way Merge
Three-way merge is a common merging strategy used in Git to combine changes from two different branches or commits into a single unified result. It is designed to handle situations where multiple branches have made conflicting changes to the same file or lines of code.
When performing a three-way merge, Git identifies three versions of the code:
- The common ancestor: This is the base version of the code that both branches originally diverged from. It represents the last common commit between the two branches.
- The ours version: This represents the version of the code in the branch you are currently on (usually the branch you are merging into).
- The theirs version: This represents the version of the code in the branch you are merging in (usually the branch being merged into the current branch).
Git uses these three versions of the code to intelligently merge the changes. It compares the differences between the common ancestor and the ours version and also between the common ancestor and the theirs version. Then, it combines these changes, considering both sets of modifications, to create a merged version of the file.
During the merge process, if there are conflicting changes (i.e., changes that overlap and cannot be automatically merged), Git will mark those conflicts and pause the merge. It prompts the user to manually resolve the conflicts by editing the affected file(s) to choose which changes to keep. Once the conflicts are resolved, the user can complete the merge by committing the changes.
Now, we'll create two files named home.html and about.html and create two commits.
# make a repo directory
mkdir projectb && cd projectb

# initialize the repo and specify the initial branch name
git init --initial-branch=main

# add home.html file
touch home.html && echo "<h1>Header for homepage</h1>" > home.html

# add home.html to the staging area
git add home.html

# commit that file to the Local Repository
git commit -m "commit 1"

# add about.html
touch about.html && echo "<h1>Header for about</h1>" > about.html

# add about.html to the staging area
git add about.html

# commit that file to the Local Repository
git commit -m "commit 2"
Now, there are two commits available at the main branch.
Next we'll create a feature branch and switch to feature branch.
git checkout -b feature# add page1.html file
touch page1.html && echo "<h1>Header for page 1</h1>" > page1.html
# add page1.html to the staging area
git add page1.html
# commit that file to the Local Repository
git commit -m "child commit 1"
# add about.html
touch page2.html && echo "<h1>Header for page 2</h1>" > page2.html
# add about.html to the staging area
git add page2.html
# commit that file to the Local Repository
git commit -m "child commit 2"Then there will be a total of four commits at the feature branch. Two commits from the main branch and the other two commits from feature branch i.e. the child branch.
Now we'll switch back to the main branch and create a file contact.html on the main branch.
# switch to main branch
git checkout main
# add contact.html file
touch contact.html && echo "<h1>Header for contact</h1>" > contact.html
# add contact.html to the staging area
git add contact.html
# commit that file to the Local Repository
git commit -m "commit 3"So, There will be three commits available at the main branch.
Next we'll merge the feature branch to the main branch.
# switch to main branch
git switch main
# merge feature branch to main branch
git merge featureA new commit will be created. That commit is considered as the merge commit.
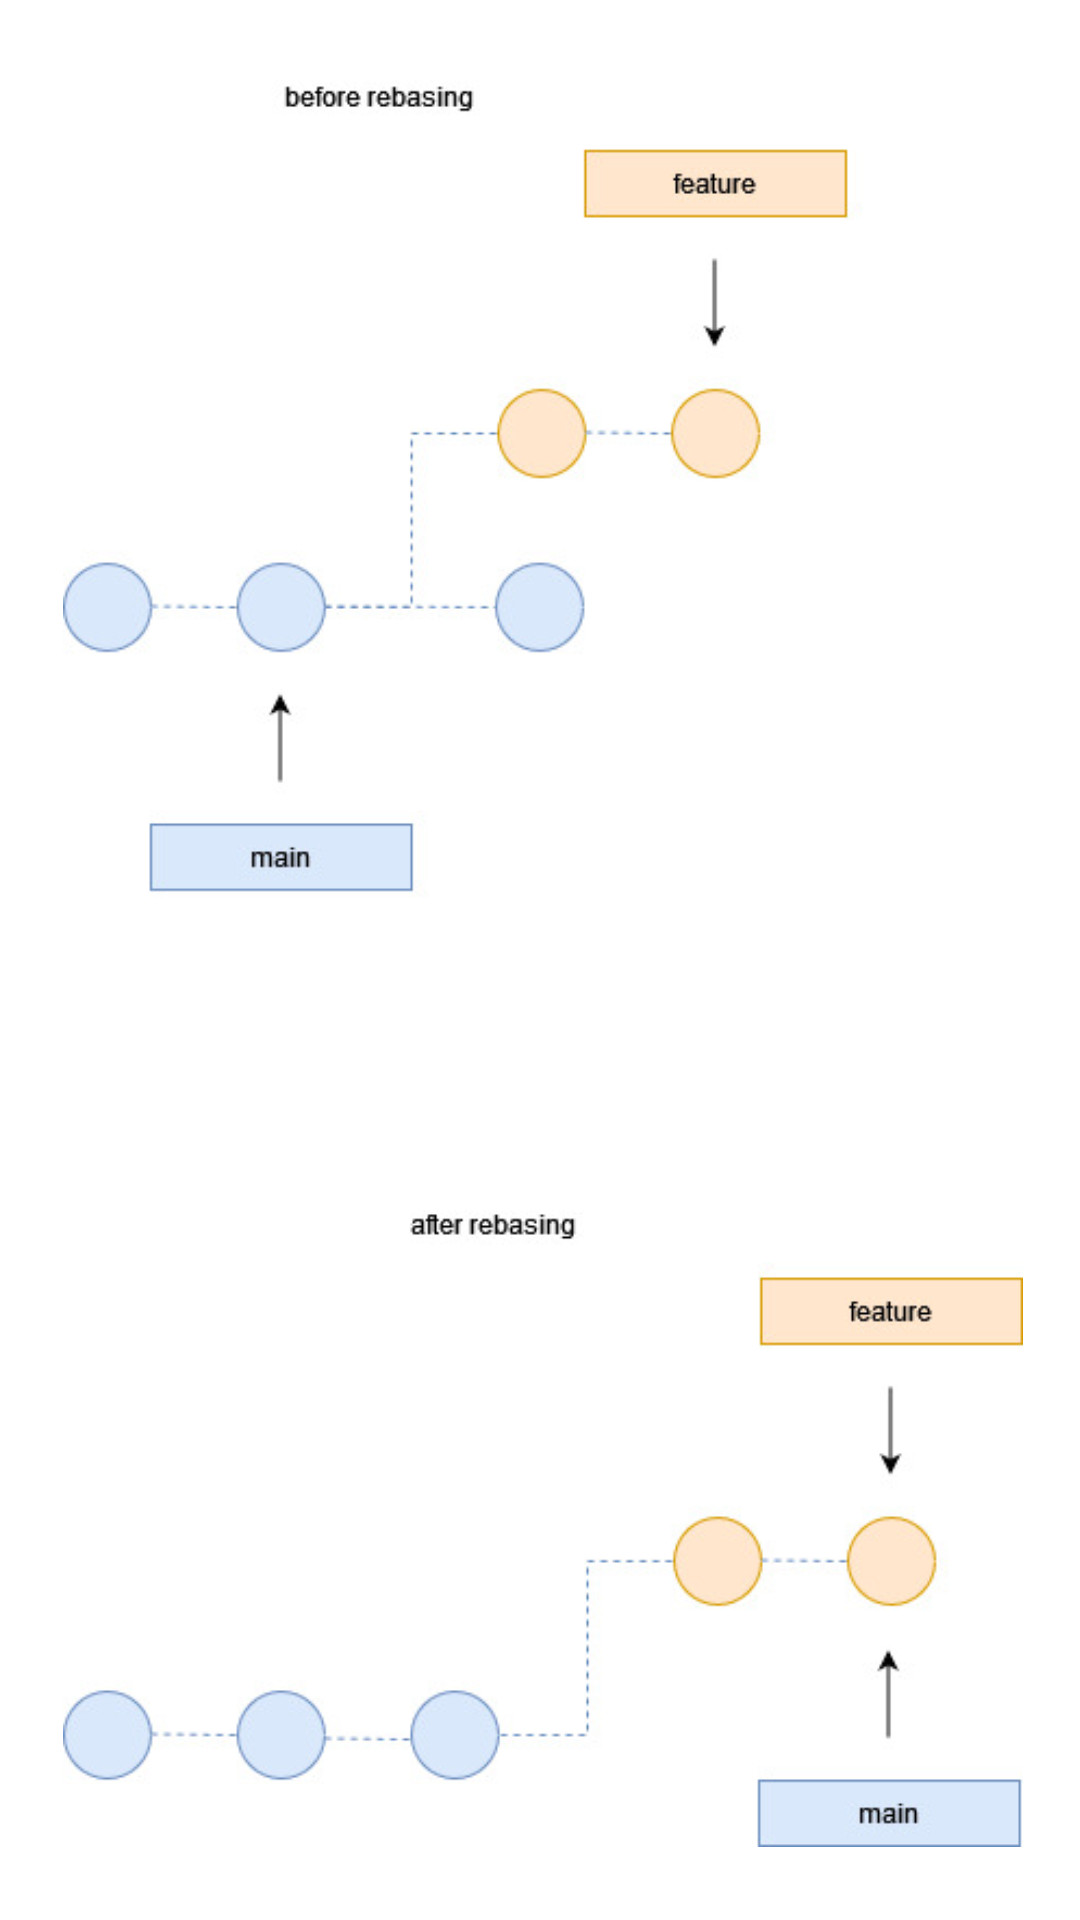
Git Rebase
Rebasing is often used as an alternative to merging. Rebasing a branch updates one branch with another by applying the commits of one branch on top of the commits of another branch. For example, if working on a feature branch that is out of date with a main branch, rebasing the feature feature onto main will allow all the new commits from main to be included in feature.
For the above example, this is what it looks like from the command line:
git rebase feature mainHowever, it is more common to first checkout a branch and then run the rebase command with the name of the branch you wish to rebase on to:
git checkout feature
git rebase mainThe golden rule of git rebase is to never use it on public branches.
For example, think about what would happen if you rebased main onto your feature branch. The rebase moves all of the commits in main onto the tip of feature. The problem is that this only happened in your repository. All of the other developers are still working with the original main.
# make a repo directory
mkdir projectc && cd projectc
# initialize the repo and specify the initial branch name
git init --initial-branch=main
# add home.html file
touch home.html && echo "<h1>Header for homepage</h1>" > home.html
# add home.html to the staging area
git add home.html
# commit that file to the Local Repository
git commit -m "commit 1"
# add about.html
touch about.html && echo "<h1>Header for about</h1>" > about.html
# add about.html to the staging area
git add about.html
# commit that file to the Local Repository
git commit -m "commit 2"
# create feature branch and switch to it
git checkout -b feature
# add page1.html file
touch page1.html && echo "<h1>Header for page 1</h1>" > page1.html

# add page1.html to the staging area
git add page1.html

# commit that file to the Local Repository
git commit -m "child commit 1"

# add about.html
touch page2.html && echo "<h1>Header for page 2</h1>" > page2.html

# add about.html to the staging area
git add page2.html

# commit that file to the Local Repository
git commit -m "child commit 2"
# switch to main branch
git checkout main

# add contact.html file
touch contact.html && echo "<h1>Header for contact</h1>" > contact.html

# add contact.html to the staging area
git add contact.html

# commit that file to the Local Repository
git commit -m "commit 3"Now we come back to the feature branch, but we want to have a linear history, moving the feature to the tip of main branch.
git checkout feature
git rebase mainTo confirm that we'll check the log using git log command
git log --graph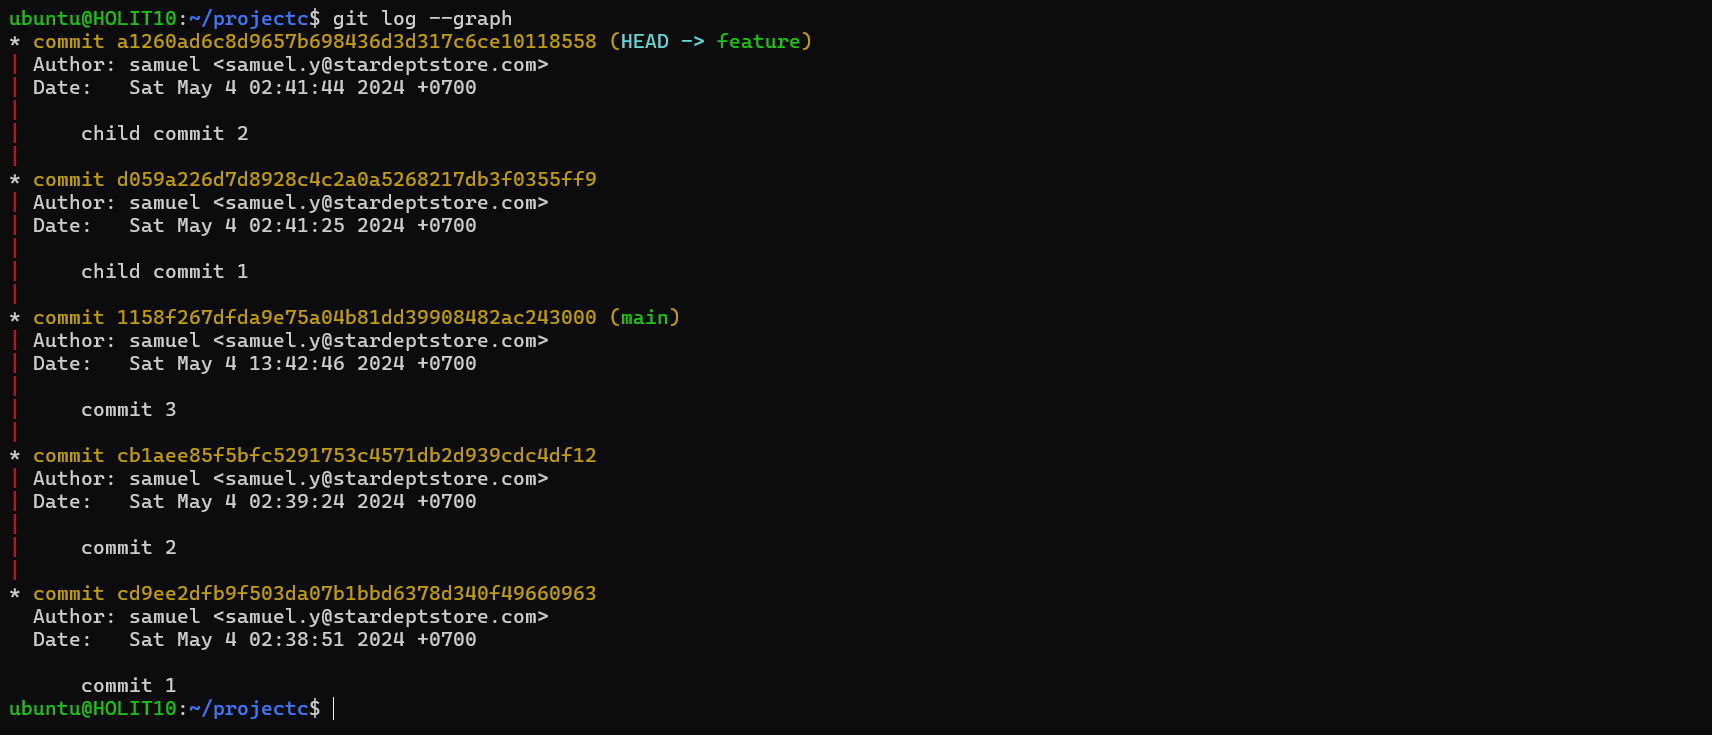
Having a linear history, we can do a fast-forward merge by merging the feature branch with the main branch.
git checkout main
git merge feature