When you install Windows 10 or 11 on a custom-built PC or a new PC without Windows pre-installed, users have the option to install the specific edition of Windows that matches the license key they have purchased(eg Windows Home, Pro, Education, etc.).
However, on pre-installed Windows 10/11 PCs, users are not given the option to select a different edition during installation. The reason is that these PCs come with a Windows license key embedded in the BIOS/UEFI firmware, which the installer automatically detects. As a result, Windows installs the edition that matches the embedded key, without prompting the user to choose.
In this tutorial you will learn how to be able to install a different version of Windows than the one that is preinstalled.
Step 1: Create a Windows 10/11 USB Installation media.
For instructions, see this article: How to create a bootable Windows 10/11 USB installation media.
Step 2: Add an ei.cfg file to your installation media
The ei.cfg file tells the Windows installer not to use the product key embedded in the BIOS/UEFI, allowing you to manually select the Windows edition during setup.
Open Notepad and then copy and paste the following lines:
[EditionID]
Professional
[Channel]
Retail
Here's a list of common Windows EditionID values that are used in ei.cfg files:
Windows 10 Editions
| Edition Name | EditionID |
|---|---|
| Windows 10 Home | Core |
| Windows 10 Home N | CoreN |
| Windows 10 Home Single Language | CoreSingleLanguage |
| Windows 10 Pro | Professional |
| Windows 10 Pro N | ProfessionalN |
| Windows 10 Education | Education |
| Windows 10 Education N | EducationN |
| Windows 10 Enterprise | Enterprise |
| Windows 10 Enterprise N | EnterpriseN |
| Windows 10 Pro Education | ProfessionalEducation |
| Windows 10 Pro for Workstations | ProfessionalWorkstation |
| Windows 10 Pro N for Workstations | ProfessionalWorkstationN |
Windows 11 Editions
| Edition Name | EditionID |
|---|---|
| Windows 11 Home | Core |
| Windows 11 Home N | CoreN |
| Windows 11 Home Single Language | CoreSingleLanguage |
| Windows 11 Pro | Professional |
| Windows 11 Pro N | ProfessionalN |
| Windows 11 Education | Education |
| Windows 11 Education N | EducationN |
| Windows 11 Enterprise | Enterprise |
| Windows 11 Enterprise N | EnterpriseN |
| Windows 11 Pro Education | ProfessionalEducation |
| Windows 11 Pro for Workstations | ProfessionalWorkstation |
| Windows 11 Pro N for Workstations | ProfessionalWorkstationN |
When you're finished creating the configuration file, go to the File menu and choose Save As. In the save dialog that appears, navigate to the Windows USB installation media on the left-hand panel. Once there, open the sources folder on the right side.
In the File name field, type "ei.cfg" — make sure to include the quotation marks exactly as shown. This ensures the file is saved with the correct .cfg extension and not accidentally as a .txt file. Finally, click Save to complete the process.
Step 3: Add an PID.txt file to your installation media
The PID.txt file tells the Windows installer which product key to use during installation. If your system has a pre-installed OEM key embedded in the BIOS/UEFI (such as for Windows 11 Home), and you want to install a different edition like Windows 11 Pro, including a PID.txt file with a valid Pro product key will override the embedded key and force the installer to proceed with the Pro edition.
Open Notepad and then copy and paste the following lines:
[PID]
value=VK7JG-NPHTM-C97JM-9MPGT-3V66T
The PID value can be either a generic key or a KMS client key, depending on what you're trying to do.
Generic Keys are default product keys provided by Microsoft that can be used to install and test Windows operating systems without activating them. These keys do not activate Windows, but allow you to complete the installation process.
KMS Client Keys are special product keys provided by Microsoft that allow Windows computers to be activated via a Key Management Service (KMS). Instead of activating each PC individually via the internet, computers activate locally by talking to a KMS server inside the company network. This allows organizations to manage activations centrally for many machines.
Here's a list of common Generic Keys values that can be used in PID.txt files:
Windows 10 Editions
| Edition Name | Generic Key |
|---|---|
| Windows 10 Home | YTMG3-N6DKC-DKB77-7M9GH-8HVX7 |
| Windows 10 Home N | 4CPRK-NM3K3-X6XXQ-RXX86-WXCHW |
| Windows 10 Home Single Language | BT79Q-G7N6G-PGBYW-4YWX6-6F4BT |
| Windows 10 Pro | VK7JG-NPHTM-C97JM-9MPGT-3V66T |
| Windows 10 Pro N | 2B87N-8KFHP-DKV6R-Y2C8J-PKCKT |
| Windows 10 Pro for Workstations | DXG7C-N36C4-C4HTG-X4T3X-2YV77 |
| Windows 10 Pro N for Workstations | WYPNQ-8C467-V2W6J-TX4WX-WT2RQ |
| Windows 10 S | 3NF4D-GF9GY-63VKH-QRC3V-7QW8P |
| Windows 10 Education | YNMGQ-8RYV3-4PGQ3-C8XTP-7CFBY |
| Windows 10 Education N | 84NGF-MHBT6-FXBX8-QWJK7-DRR8H |
| Windows 10 Pro Education | 8PTT6-RNW4C-6V7J2-C2D3X-MHBPB |
| Windows 10 Pro Education N | GJTYN-HDMQY-FRR76-HVGC7-QPF8P |
| Windows 10 Enterprise | XGVPP-NMH47-7TTHJ-W3FW7-8HV2C |
| Windows 10 Enterprise G N | FW7NV-4T673-HF4VX-9X4MM-B4H4T |
| Windows 10 Enterprise N | WGGHN-J84D6-QYCPR-T7PJ7-X766F |
| Windows 10 Enterprise S | NK96Y-D9CD8-W44CQ-R8YTK-DYJWX |
Windows 11 Editions
| Edition Name | Generic Key |
|---|---|
| Windows 11 Home | YTMG3-N6DKC-DKB77-7M9GH-8HVX7 |
| Windows 11 Home N | 4CPRK-NM3K3-X6XXQ-RXX86-WXCHW |
| Windows 11 Home Single Language | BT79Q-G7N6G-PGBYW-4YWX6-6F4BT |
| Windows 11 Home Country Specific | N2434-X9D7W-8PF6X-8DV9T-8TYMD |
| Windows 11 Pro | VK7JG-NPHTM-C97JM-9MPGT-3V66T |
| Windows 11 Pro N | 2B87N-8KFHP-DKV6R-Y2C8J-PKCKT |
| Windows 11 Pro for Workstations | DXG7C-N36C4-C4HTG-X4T3X-2YV77 |
| Windows 11 Pro for Workstations N | WYPNQ-8C467-V2W6J-TX4WX-WT2RQ |
| Windows 11 Pro Education | 8PTT6-RNW4C-6V7J2-C2D3X-MHBPB |
| Windows 11 Pro Education N | GJTYN-HDMQY-FRR76-HVGC7-QPF8P |
| Windows 11 Education | YNMGQ-8RYV3-4PGQ3-C8XTP-7CFBY |
| Windows 11 Education N | 84NGF-MHBT6-FXBX8-QWJK7-DRR8H |
| Windows 11 Enterprise | XGVPP-NMH47-7TTHJ-W3FW7-8HV2C |
| Windows 11 Enterprise N | WGGHN-J84D6-QYCPR-T7PJ7-X766F |
| Windows 11 Enterprise G N | FW7NV-4T673-HF4VX-9X4MM-B4H4T |
When you're finished creating the PID file, go to the File menu and choose Save As. In the save dialog that appears, navigate to the Windows USB installation media on the left-hand panel. Once there, open the sources folder on the right side.
In the File name field, type "PID.txt" — make sure to include the quotation marks exactly as shown. This ensures the file is saved with the correct .txt extension and not accidentally as a .txt.txt file. Finally, click Save to complete the process.
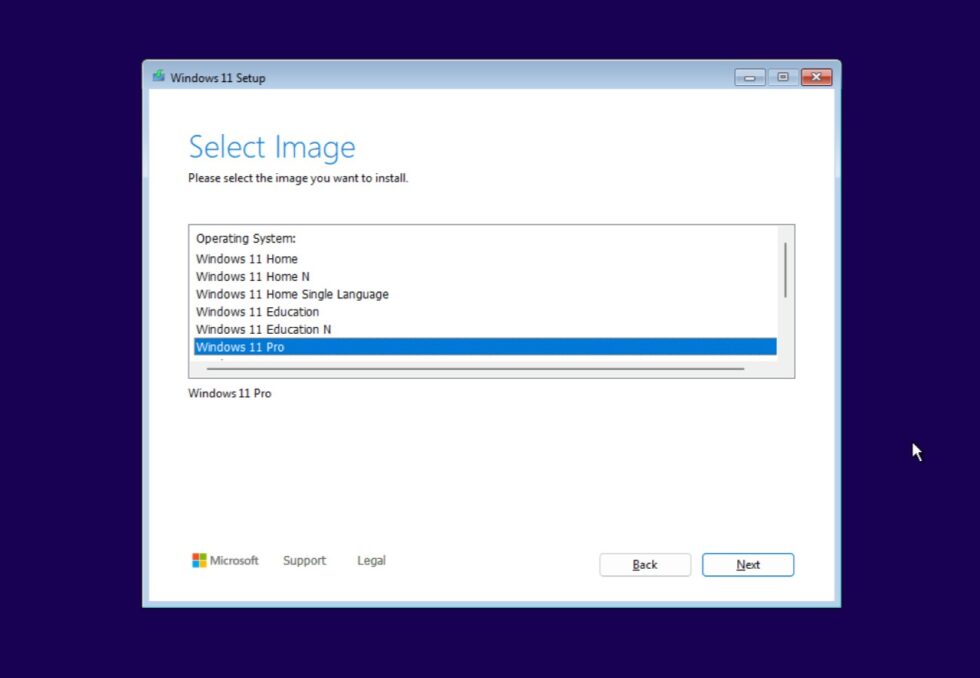
After setting up the ei.cfg and PID.txt files correctly in the sources folder of your USB installation media, boot your PC from the USB. During the clean installation process, you will now be able to choose the edition of Windows 11 or Windows 10 that you want to install.